10 Windows in 899 Square Feet

My home has a lot of windows. This is amazing, because the 630 sq ft apartment we had before this had two total and there was no light. I love that I have so many windows now.

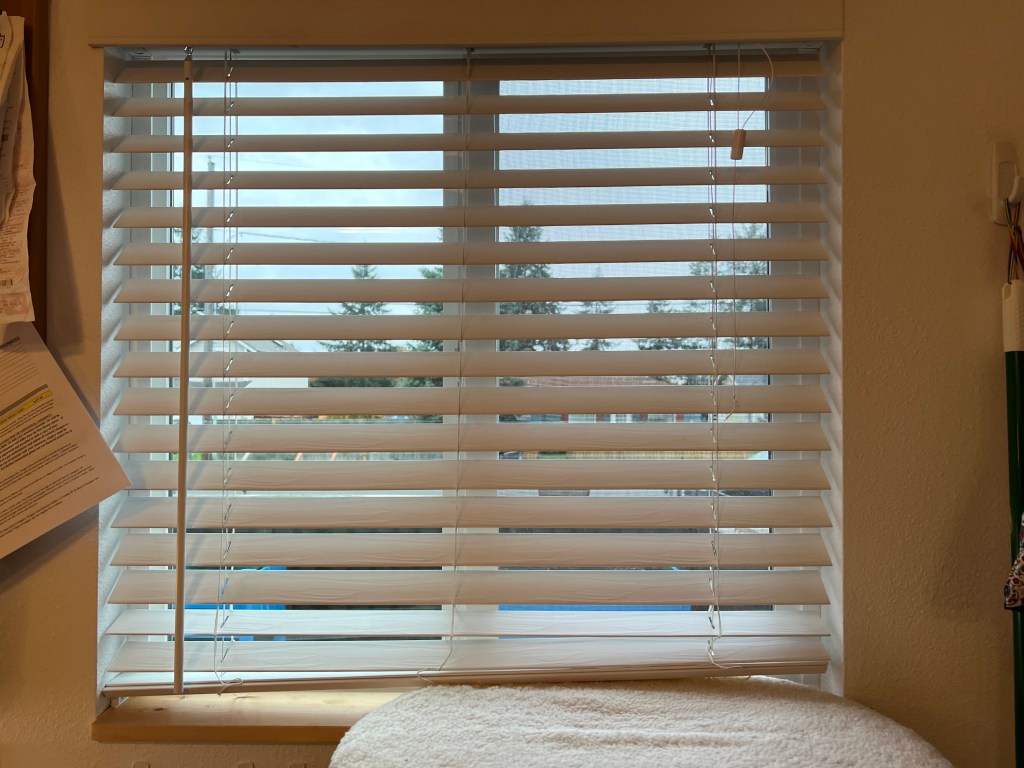
However, my home came stock standard with white blinds. I am not a fan of blinds. I hate raising them, lowering them, and twisting the little rod to get them to angle the blinds in the right direction. They are not really energy efficient, and hot summer and cold winter weather came right through them. Plus, I never ever feel like they are completely closed. I know they are, but I always feel like you can see into them.

The window blinds that came with my house. The fuzzy platform is a cat shelf I have installed so my little monster can scream at other cats, squirrels, and god knows what at 3am.

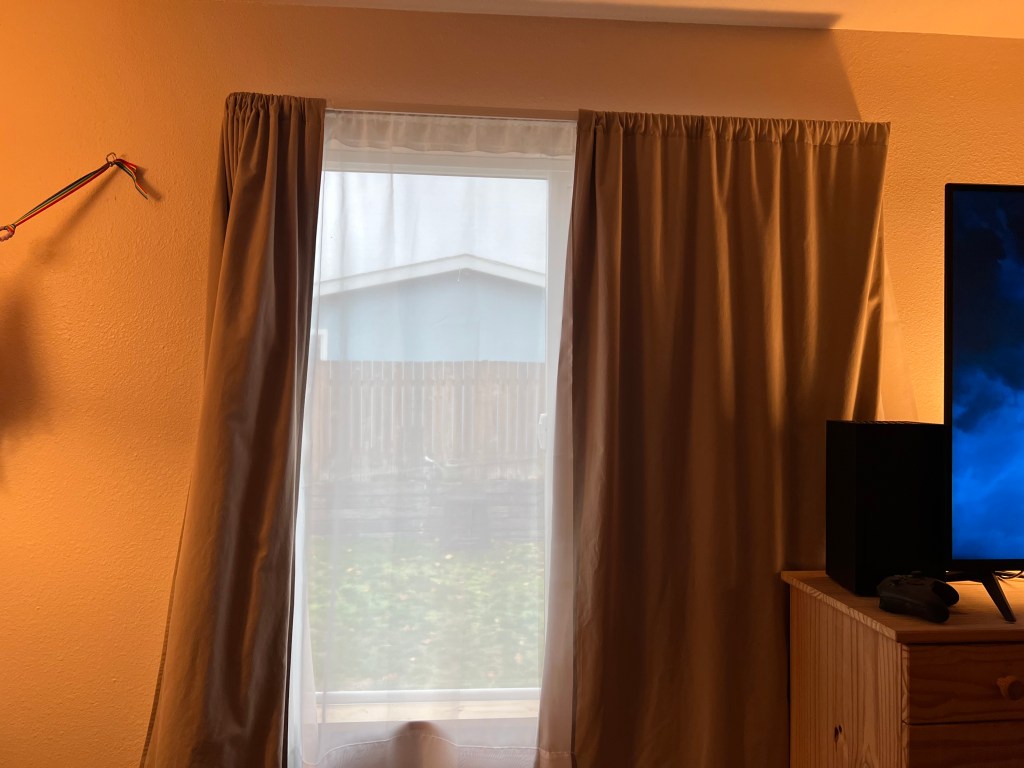
I like blackout/insulated curtains, and I found this great blackout fabric on Amazon. (not an affiliate link) The fabric is insulated, so it helps keep heat in during the winter and out during the summer. It’s white, so from outside you see white curtains with the blue house, and that looks cute.

For the inside layer of curtain fabric, I bought sheets for everything but the bathroom. I got jellyfish fabric for the bathroom to keep with my undersea theme. I needed ten windows worth of fabric, and that’s a lot. Joanne’s seems to be dying a long tragic death, and has little in the way of selection, and Fabric.com got bought out and closed by Amazon. Because of all this, it was just easier and cheaper to buy flat sheets from Walmart for fabric.

It was a really easy job to sew them up. I just made a big pocket and doubled over the top for the rod to slip through.

Sewing my bathroom curtains.

I added some inexpensive curtain rods to the my windows. Maybe when I do the rooms in their final colorful fun form I’ll replace those rods with fancy ones. I don’t know yet.

Curtain rods were easy to install and were not crooked. The camera angel just makes it look that way.

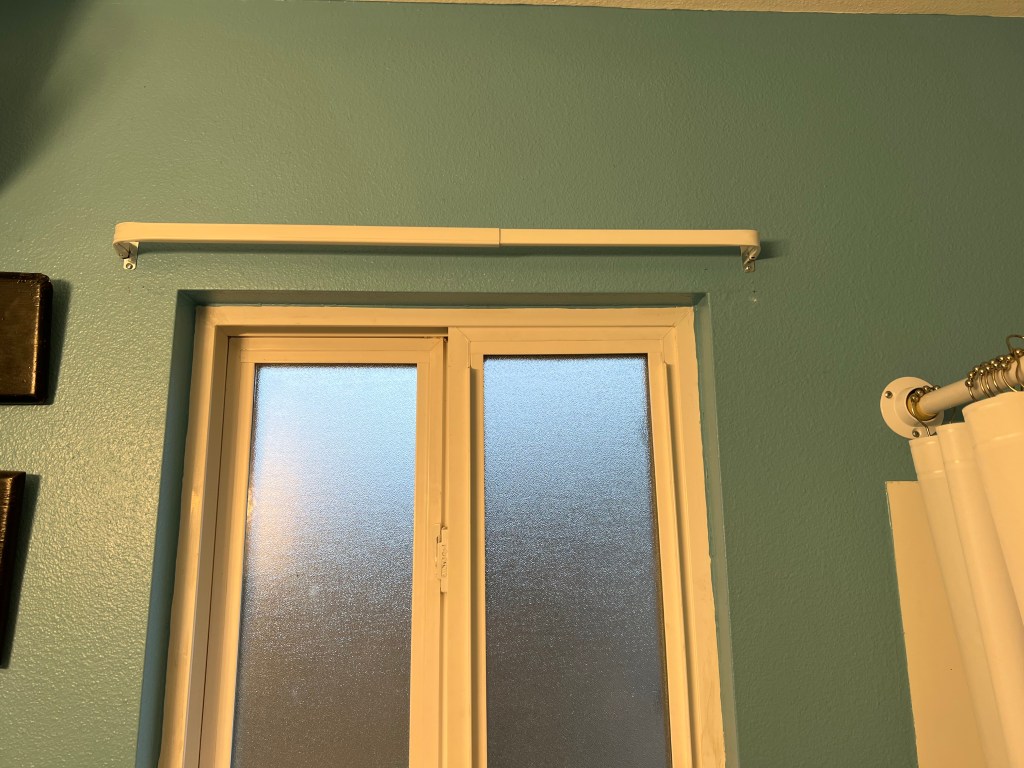
I also don’t want my neighbors seeing into my home, so I got double rods for all of my larger windows. This allows me to put sheers into the inner rod, so we can see out, but nobody can see in.

They have an Arlo camera right at our bedroom window there, so I like having a privacy option. I don’t know how much they can see, but I’d rather be safe than sorry!

I started this project last year in December, and I have 7 out of 10 curtains done. The last windows in the dining/kitchen area need done still, but are challenging because I need to figure out how to hang them when the windows but up against the cabinets with zero space to spare.

What I didn’t expect was how effective on heat and cold insulation these curtains would be. You can physically feel the different behind the curtain when it’s hot or cold out. The difference is shocking. If I had know these kind of insulating fabric for curtains existed, I would have done this years ago. Not to mention the black out effect is better than any store bought black out curtains I have ever had. I can sleep midday and it’s dark in my room now.

This makes this project far more effective than I could have imagined. First, I feel safer in my home with windows that feel fulling closed. You can’t put a price on that. Second, the insulation quality of the curtains with that black out fabric was off the charts. I totally underestimated how much of a difference this would make. I highly recommend this, if you can sew even a tiny bit. This is an easy project to help insulate your home and depending on how old your windows are? This could really help.

Seed Storage

It turns out I have quite a few seed packets in my possession and I needed some seed storage. I first tried a little tin box but that turned out to be annoying to file my seed packets in. Apparently I have too many, and not all of them are in the same size packet. (I don’t get paid for any of the links, this is just what I used.)

It was a cute little box if I didn’t have such a large pile of seeds it would have worked.

I also wanted to be able to clearly see them so I got myself a 3″ binder and seed insert pockets. This worked way better.

The problem was the binder was seriously weak. It is so weird because I have two other 3″ Avery binders. One is from 20 years ago. It’s still going strong, and sturdy and protects my art work. This one, though? The sides were so bendy it just annoyed the crap out of me.

I decided to make my own binder using the hardware. I bought some bookbinders hardboard off Amazon, and some paper off Etsy and followed some simple Youtube tutorials.

I drilled out the rivets holding the 3″ binder rings in the old binder so I could just use some Chicago Screws to screw it to the new binder. I really like Chicago Screws as they are internally threaded. I have used them on random book related projects before.

Internally threaded Chicago Screws.

I then measured and laid out the book boards, and covered the whole thing in butcher paper. Which, immediately bubbled up with the glue, and took a lot of work to smooth out. I used some random rust colored linen backed with interfacing as a book cloth for the spine so it would last longer.

I had already cut out the binder boards and glued them to the butcher paper and fabric and cut holes for the binder hardware.

I glued the whole thing up, and drilled holes big enough for my Chicago Screws to put the binding rings back in, and covered the interior with paper.

External cover paper glued on. Just waiting for it to dry so I can put on the internal paper.

I added a pocket, which I am not really sure I like, to the front cover, and screwed the binder hardware in, and added my seeds and an alphabetizing rainbow divider in.

I like to put my seeds in a little seed envelop, paperclip the top, and keep the seed packet for directions. My irrigation plans are on the yellow legal paper in the pocket.

Inside of finished binder showing seed pockets, dividers, etc.
Finished external binder. (Notice the expensive Whynter ice cream maker int eh background. I have to talk about that eventually. Best purchase ever! )

It looks a little warped but further drying with the Modge Podge and it straighten out.

Struggles with this project:

  1. I used butcher paper as a base layer on the hard boards. The second it touched the glue, it bubbled like crazy. I had a very difficult time getting it flat and smooth because using butcher paper like that is a terrible idea.
  2. Precision. This has some minor measure issues because while I can measure and cut, when you add wet glue, and bubbling to the equation, it was a lot harder to get things to line up with precision for me. This might just be a me issue, but that was rough.
  3. Hardware. Getting the hardware on was so easy, I did not initially test it with the binder closed. When I did, the spine angled out because I had placed the hardware too close to the spine, and had to move it in by a 1/4 inch. I should have checked this, but did not. I fixed it by filling the old holes I had drilled through the hard board with balls of cover paper and Modge Podge. Worked just fine as it was all under the green cover paper.
  4. Glue choice. I had Modge Podge on hand and used that, but I am not sure it was the best choice. I will probably get an acid free bookbinding glue next time. I just felt this bled through the papers so much.
  5. Book Cloth. I watched some YouTube videos on using iron on interfacing to make book cloth so I did that with the rust orange linen I had on hand for this. As soon as it hit the glue, the whole thing wanted to peal off, and I had bubbles, and it was stressful. I almost started over at that point. Whatever interfacing brand I had, which I have no idea, just didn’t want to work with this. It’s iron on, so I have no idea. I will probably get the actual Heat’n’Bond as recommended next time.
  6. Outer cover paper. This was a hand made green leafy paper, and I think it was too porous. The Modge Podge bled through funny in some places. It’s alright, but I think I would look to treat it differently to prevent that in the next version.

However, all in all, I am happy. This is as sturdy, or more so, than my 20 year old version of a 3″ binder. Even better, it looks cool. I might try to Cricut cut some dividers that are all mine, but I haven’t decided yet.

New Crochet Project – Skull Granny Squares

I finished my scarf for winter, and switched gears. I have been loving doing granny squares. Once you get them memorized you can sit and watch TV and make little squares.

I actually bought this pattern on Etsy from a seller named SleepyFrogCrochet. The directions are clear with lots of pictures.

Skull granny square.

I am using Carron Blossom Cakes in 37012 Yacht Club and 37017 Blossoms for colors.

It’s coming together pretty well. There is a couple trickier spots for me, but overall it’s been fine. I have about ten of them, and I am just going to keep making them until I have a blanket.

The cat is significantly less interested since it’s not wool, not that it stops her from attacking my yarn.

Garden, a Dragon Onesie, and iPad Storage

I got the stakes to fix my broccoli. It’s been windy and rainy here, so all my broccoli fell over. I had no idea it needed staked, because I hadn’t ever grown it before, but now it looks much better. No more sideways plants, with upside down leaves. Ignore that tiny one. It’s a replant when that square of broccoli didn’t come up. He’s doing fine.

Also, my Amazon purchase for my wife came in. I like to buy her things. Today? It was a red dragon onesie. I love it and she was thrilled with it. The cat? Tally is really not too sure about this development. She’d only just gotten over the balloons my wife got as a get well soon gift from her coworkers for after surgery.

Behind her is a router and all sorts of internet cables on the shelves. I was supposed to drill a hole through the wall, install 2″ desk grommets, so the wires could go through, but instead I made wall pockets for iPad and laptop storage next to our bed.

I found a unicorn tote for my wife, the lovely disaster unicorn, and a hail gay satan one for me. Yes, yes I did find a hail gay satan tote bag on Amazon. You can find anything there. It’s amazing sometimes.

We both use an iPad in bed, and my wife also uses an old laptop for writing her YouTube scripts and gaming notes. I am always concerned they will get stepped on, so I made them a place to go up off the floor. We can’t use a normal nightstand arrangement because our bed is literally in the closet, sticking out, which is cool with star lights, but I don’t want to do pictures until I finish the canopy for it. This means we have to get creative with storage.

Also, my wife has ADHD, and tucking anything in for a nice clean look was out the window 30 years ago when we married. I find keeping everything in easy to access and visible areas increase the likely hood that it will get put away, and that she will remember where it is.

This is actually straight, but the picture makes it look crooked.

Construction was just a fabric envelop made out of tote bags with pictures I liked on it, and then I used the straps for the totes to make a small loop at the top, then I put some hooks in the wall, with carabiners I had laying around. The rainbow ribbon was just what I had on hand because I bought 100s of yards of it on Amazon once, so I use it in my projects when I need a bit of ribbon tab.

The most exciting part about this is I own the whole damn house, and I could use actual hooks that screw into the studs in the walls. It’s not a rental, and if I want to put holes in my walls, I sure as hell can. The sheer freedom to put 6 cup hooks in the walls? Worth every penny of my mortgage.

Crochet Helper

I am making a very large scarf and Tally has been all over it. She cannot understand why she can’t attack it, lick it until it’s fuzzy, or generally freak out on it. She’s very disappointed her input is not being taken.

I am not the greatest with yarn arts, but I like to crochet because it gives me something to do with my hands besides pick at my cuticles when I am nervous. I haven’t really done a lot of it since before I transitioned to male, so I don’t actually look forward to dealing with the extra attention as a man who crochets if I take it out of the house with me.

I think knitting, crochet, and sewing are so very unnecessarily gendered. I like it, and I am not giving it up just because I look like some random cis dude these days.

2004 Yarn Drama

Wolsey’s in the paper for knitting

This is me pre transition. I’m not sure I have thick enough hair to take dreads these days. Such is the price of testosterone, but it’s a price I happily paid.

Funny enough I went to a little yarn shop in my small town and the older boomer-aged ladies recognized me from the paper, probably the dreads, and were MAD! I was told I didn’t deserve to be in the paper for knitting. I was approached at WWU while I was attending because I used to sit in Red Square and knit between classes. Probably more crochet than knit but the whole Stitch’n’Bitch knitting phenomena was going full swing, so the reporter was focused on knitting.

Apparently despite the article being about younger knitters, they felt the article unfairly focused on . . . younger knitters. I never went back to that little yarn store, and it was out of business in less than a year anyways. I can’t say I was surprised.

This picture was 19 years ago. I no longer have dreads, and I certainly don’t look like a woman anymore.