I never thought my strawberries would make it, and about half of them decided to grow like mad, and the other half produced berries. Not enough for jam, but enough for strawberries for my breakfast.
Breakfast of champions. Garden strawberries and yogurt, and hot cocoa. I know it’s like 90F every day, but I still have to start the day with hot cocoa.
I may have misjudged my ability to preserve and can, and work with so many tomatoes. My Ball book has crushed tomatoes that I can make per jar so I will probably can a jar at a time until the majority come up.
The problem is I am getting more than I can use at once, but not enough I can process into canning jars. I need 2 and 2/3 pounds per jar. I have close to 2 pounds sitting on my counter until tonight or tomorrow morning. I would rather do it today as I have today off, but I may have to can it up tomorrow for just one jar before or after work. Which, with my nature being inherently lazy, seems like a lot in one day.
The cucumbers are kind of doing the same thing. I am getting two or three at a shot, often enough I have to pull them or risk my plant giving up on me and dying, but not enough to can. I might have to make refrigerator pickles out of a bunch of them unless or until a huge batch comes up.
I am working it out, but there are definitely logistic issues about planning to can and preserve these that I never considered. Gardener Scott, on his Youtube channel, has a freeze dryer, and now I can see the appeal. You can do a small bit at a time once you own the machine. That’s not even close to being in my budget though. Nor do I have a powered shed to plug it into.
As for my latest crop I planted, the beets? They are already starting to come up. I just have to keep everything watered during this 90F+ week.
Watering has been a bit of a challenge with the overwhelming record heat. We don’t normally do this kind of hot extended sunshine here in the Pacific Northwest, so I am glad I put in the irrigation drip lines. I would not be happy standing out in it, watering for hours, with the sun on my head. Good job past me!
For a first year garden, these are all great problems to have. It’s already making me consider next year and how I want to handle that. So far, so good though.
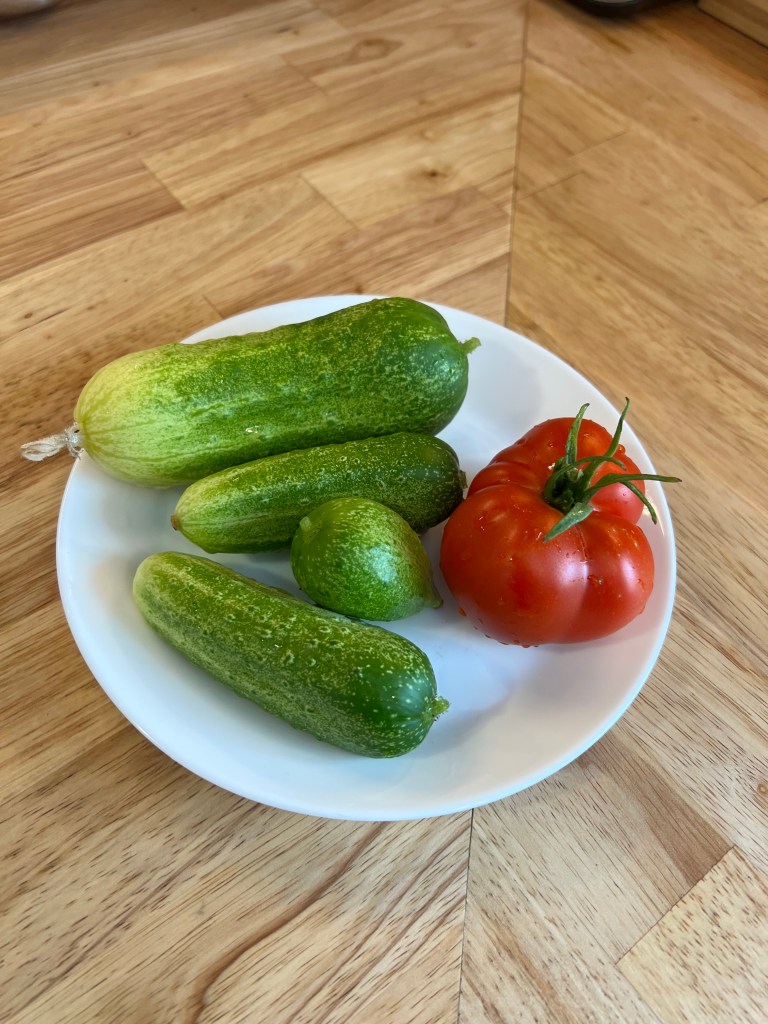
The above are 4 cucumbers and 1 tomato that are ahead of the pack. I am so thrilled by this.
It has been so long since I ate gardened food, I have forgotten just how amazing things taste when they are home grown. Like, words cannot capture the depth of flavor these have.
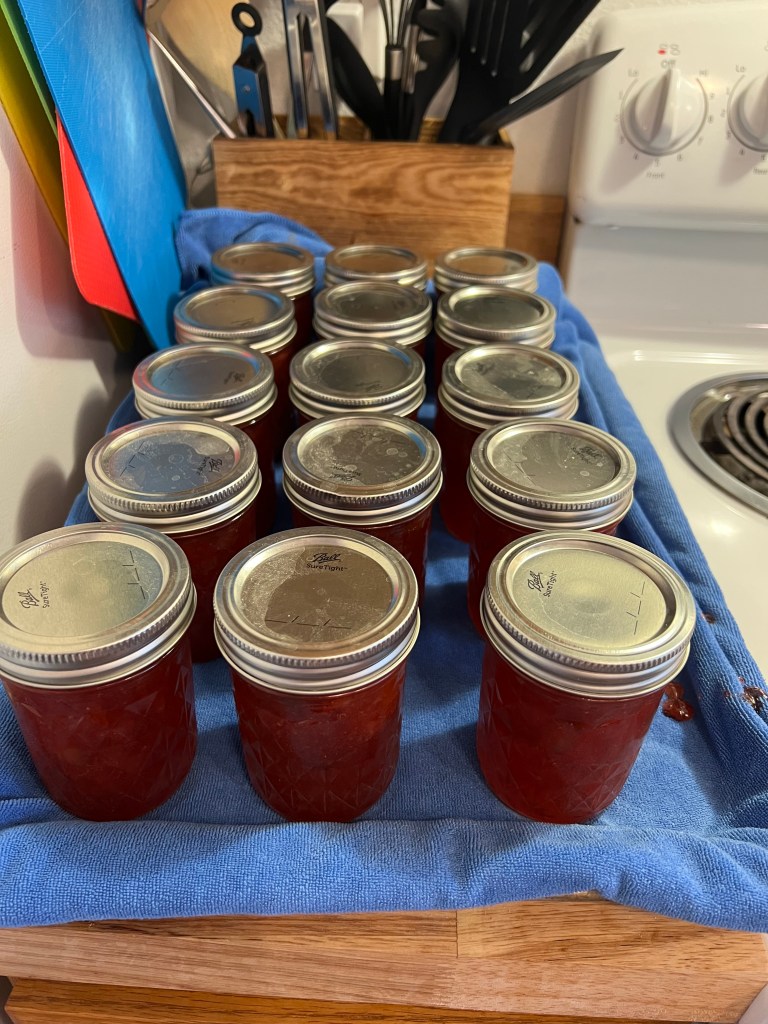
I managed to make Jam last Friday. I took it easy all week, so I could do it.
This is fifteen jars of strawberry rhubarb jam. I could not have done it without over six pounds of rhubarb my real estate gal brought over to me. I got up super early and hit the business version of Costco at 7am, and grabbed the strawberries. So far, in my area, Costco has better fruit than anywhere, and it’s cheaper in bulk.
I was up and jamming, done by 10:30am, and back to bed for the rest of the day! That’s definitely a success because I got it done. Baby steps!
As for the garden? See for yourself.
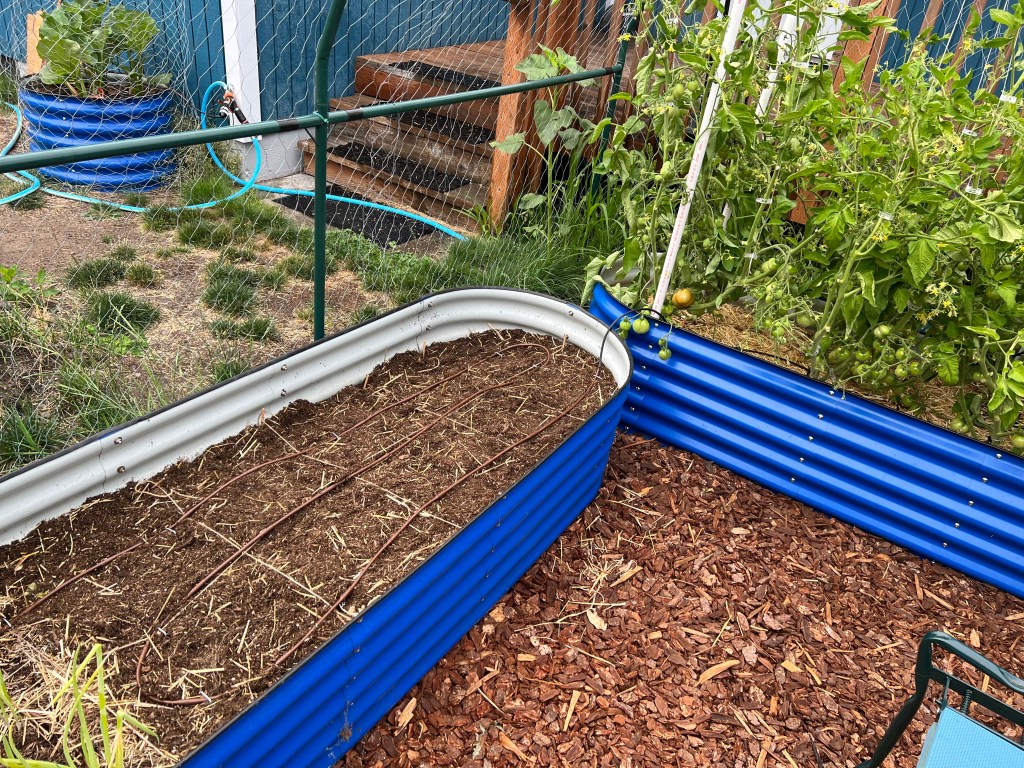
My garden is looking good. You’ll notice I am missing broccoli in the upper left bed. I harvested it, and then all it was doing was attracting cabbage moths like crazy. I decided to pulled it. It will compost it down for next years beds. My bush tomatoes are going crazy in the back. Even with careful pruning I am no match for them.
My cucumbers on the lower left are also doing amazing. I hope I have a lot to can as pickles!
This is my old broccoli bed. It was planted with beet seeds that I soaked overnight. I also laid out some of that Rainbird irrigation tubing so I can keep them watered with the rest of the garden.
I was using the dripper ends on the broccoli going to each plant, but honestly, I prefer the drip lines. They provide enough water, and may not go to each plant, but setting up individual drippers takes time, and is hard on me to hunch over and get it sorted out. This takes minutes and works just as well.
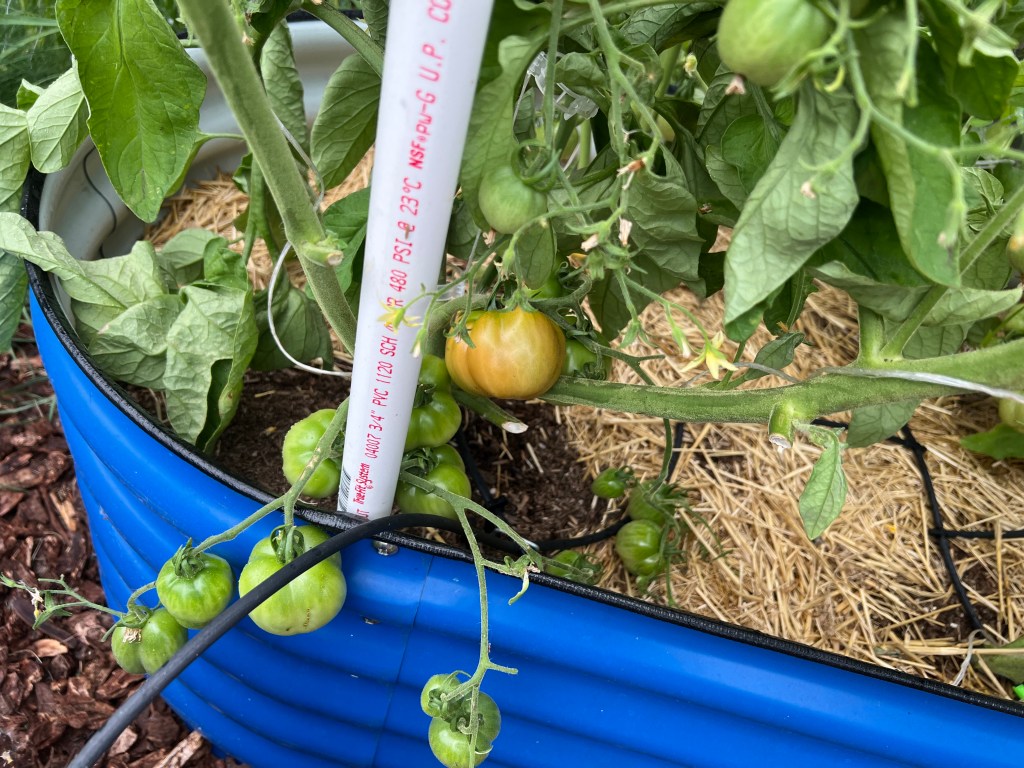
This right here? That is the first tomato of the season. Getting the 55 day tomato seeds from botanical interests really allowed me to hedge my bets. I got a version called Glacier from Botanical Interests which is a semi-determinate, whatever that really means is up in the air for me.
I have ordered seeds from a few different places, but I find Botanical Interests has way better packets, and has information on the plants inside the packets too. Plus, I feel I get a higher germination rate on their seeds. One of the guys who runs that business has a Youtube channel called Epic Gardening. He has good videos, and tutorials, and explanations on there, with a generous side of sales. That’s how I learned about Botanical Interests, so I guess it worked out.
I am in zone 8b, and am closer to the coast. I am in a weird little microclimate that is always breezy too. Like you could be blocked on either side, but our little valley is constantly just a little breezy to outright windy. In this heat, that is a bonus.
While I am not a fan of temperatures above 70F, my garden is loving it. I have been in the Pacific Northwest my entire life, and we hit record temps all July, and are looking to do it for August as well. I figure since this is happening, my beets may get a good bit of sun and warmth to grow up.
This is the first time I have ever had this much space, and a lot of the plants I am growing are first time plants. I am shocked and pleased at how well it’s all going.
My real estate gal, who sold us the house we are in, is an absolute hero. She got the sale despite multiple bids, by telling the seller our history. We are first time home owners, and we’ve both been homeless as kids. That we’ve fought our entire lives, and now that we can buy a house, we didn’t have enough to win a bid war of any kind.
The owner was older, and he chose our bid because he wanted to give us a chance, and even left us a lawn mower, and extra light bulbs, and fridge filters. The guy was a saint.
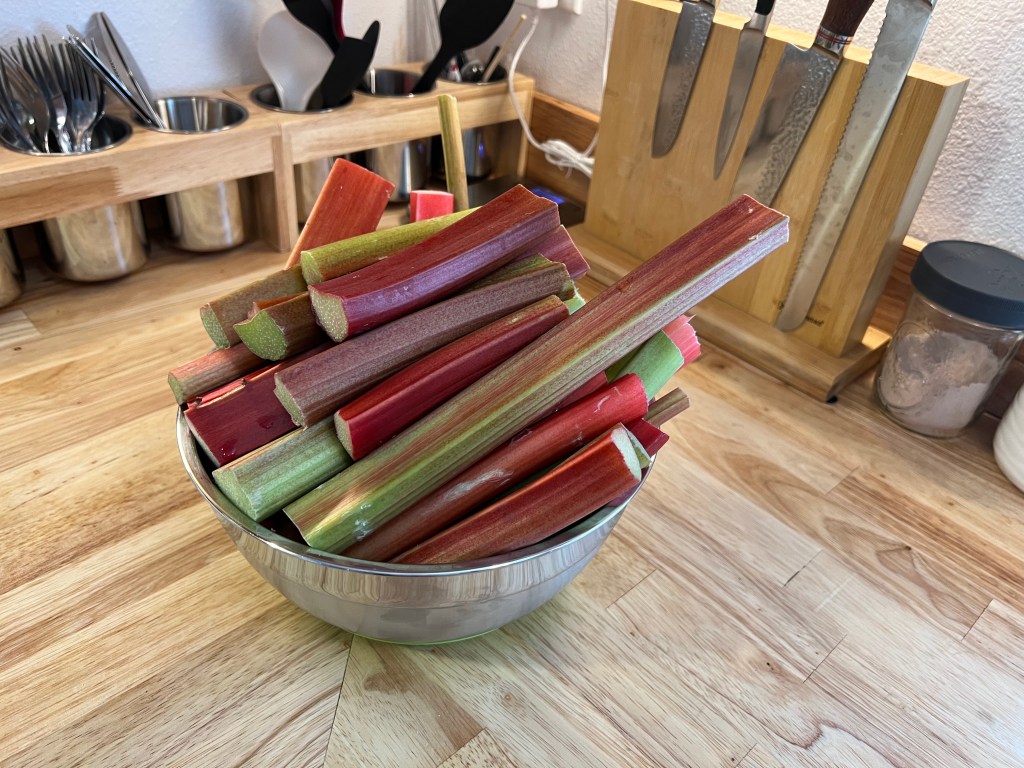
She still comes and checks in on us from time to time, and last weekend she brought me some rhubarb. My rhubarb plants are tiny, and won’t be ready for harvest for a year or more and she’s a gardener too, and had enough to spare. I was very touched by her gifts.
6.5 pounds of cleaned and cut rhubarb!
My plan was not to do more jam canning until this coming Friday, but with the lovely gift, I felt I should probably do it Sunday anyways. So I went to bed Saturday night fully intending on getting to the store in the morning.
Unfortunately for me, my body was not cooperative. Standing all day and jam canning on Friday, after a full work week was already as much as I could do. I woke up Sunday, and that was it. I was done. I was already sore upon waking. I would have liked to be able to just go go go, but I have a disability and sometimes I just can’t.
Then, I remember I could process the rhubarb by freezing it, and could do the jam this weekend. That gave me days to rest up in preparation for this.
Processing rhubarb.
I cleaned, and cut up all the rhubarb. I peeled the bigger stalks, but left the smaller ones whole. I laid them out on cookie sheets and froze them in batches.
I then packed them into freezer ziplock. I packed two jam bags with the exact amount I need for the jam I am making, and I still have pounds of it leftover. My wife is thinking of making a pie out of some of it. This is honestly garden gold right here.
Sometimes you can only do what you can do. I do have a physical disability, but it would be the same if my disability wasn’t physical in nature. Sometimes you just have to slow down. I have to remind myself that it’s okay to slow down.
I am trying to give myself the grace I would give someone else. If someone came to me and said I can’t do this today. I am already sore, and it might push me into a painful situation where I will go to work the next day and struggle? I’d totally give them the out.
But I think it’s harder to give ourselves that same grace. It’s easy to tell ourselves we can power through, that everyone else is fine, why not us? It think that is a hidden struggle with disability, especially if you have an invisible one.
When I first started having problems with my joints, I did that all the time. It ended up with me in pain, flat on my back. Now, if I slow down, and just do what I can? It just works out better.
I am still going to get that rhubarb jam made, but it will be on my timeline, when I am able. That’s okay.
Yesterday was blueberry canning day. We got up super early, and went to the business Costco that is open at 7am. We bought 8 flats of 18oz blueberries. We only needed 6.5 flats, but that meant we could have blueberry smoothies, and my wife can make a blueberry cobbler later. We paid under $40 for all of them.
As an aside, I have purchased canning berries all over town. Trader Joes, Fred Meyers, QFC, and some farmers market stands. They don’t hold a candle to the quality and price of Costco where I am at.
I used two recipes:
Blueberry Syrup – Ball complete Book of Home Preserving – page 193
Blueberry Jam – Ball Back to Basics – page 63
I only use ball or USDA recipes. I follow them religiously, as if my life depended on it. Which it kind of does with canning, because botulism is not how I want to end my time on earth.
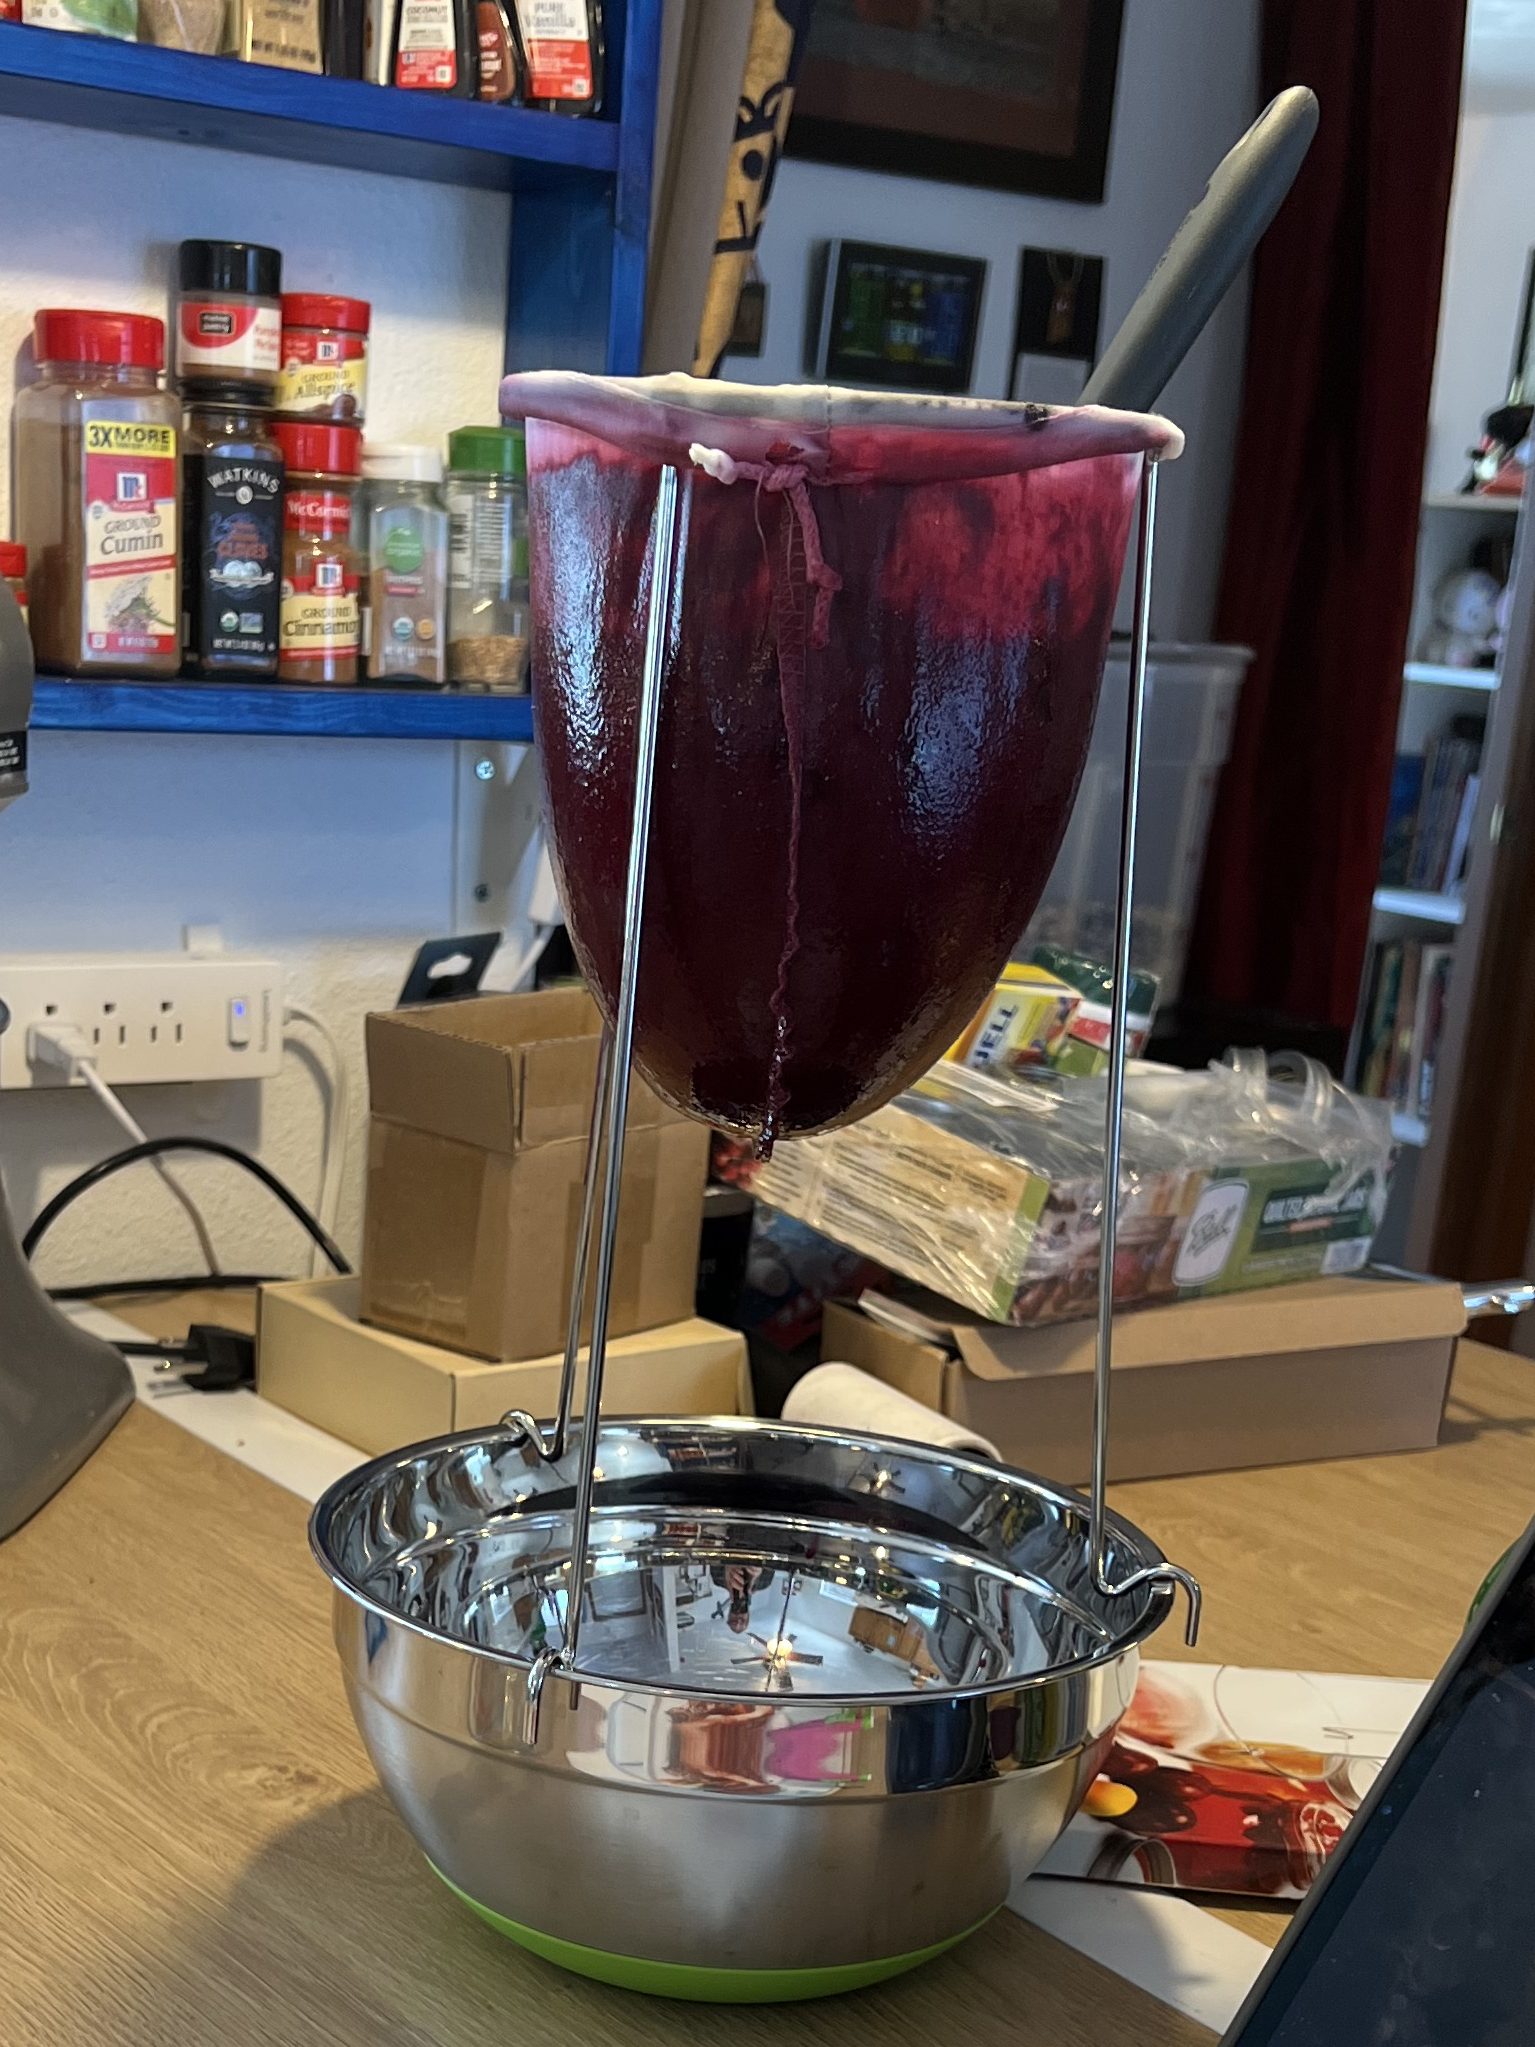
The first thing I did was prep the syrup blueberries because they have to drain for like 2+ hours. I used one of those jelly bag rigs that you can buy on amazon, (not an affiliate link) and just set it up on a bowl to drain. It was a rather macabre scene, and I felt like a witch making a potion.
This actually took more like 4 hours and it probably could have been left a few more.
There are recipes like Ball’s 2-in-1 that lets you make blueberry butter with the solids that remain, but honestly, I tasted the solids after I let it drain. They taste flat, and are all the flavor is very reduced. I just composted the solids that were left in the bag, which was quite a bit more than I expected. My compost bin now looks like a murder scene.
Once that was set up, I then started with the blueberry jam. My jam recipe was small, so I had to do it twice to get the yield I wanted. That was fine. I was expecting to take the day for this.
The biggest amount of time was the water bath heating up. I had to toss the water and start over between the second jam load and the syrup because jam got into the water, and crystalized sugar on all the jars.
Syrup on the stove, and jam cooling on the towel.
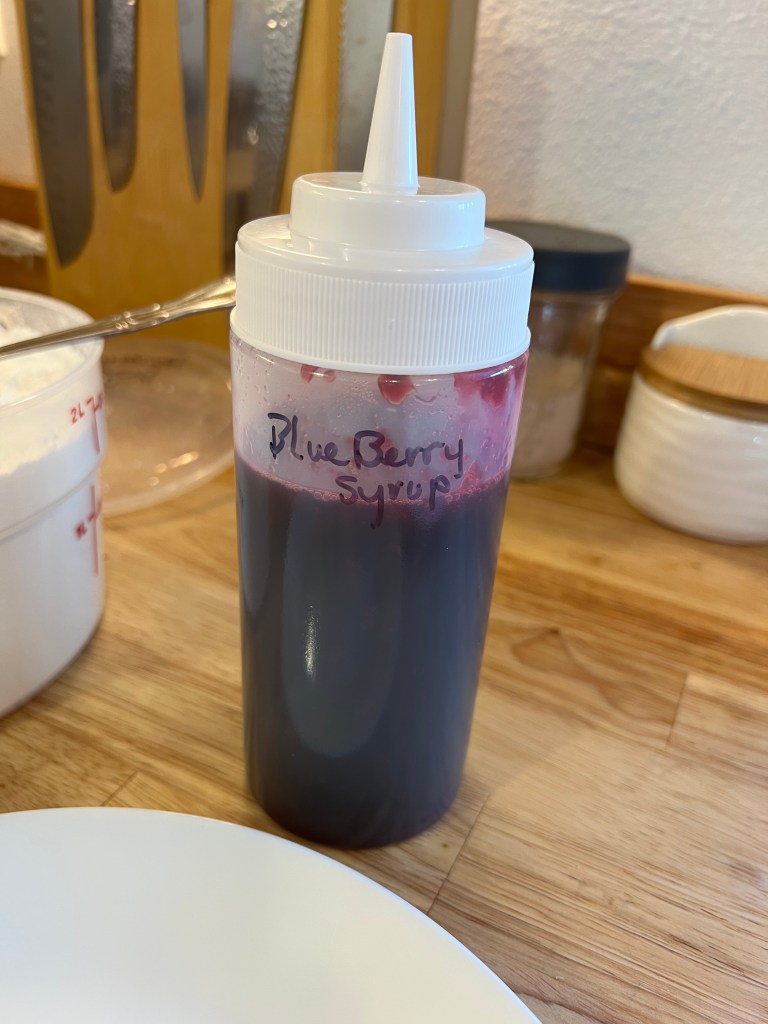
The syrup took longer than I expected because my recipe called for heating it to 230F. My wife kept assuring me it takes a while because she’s a candy maker and baker, but this took FOREVER. It was also getting into afternoon and my house was already hot. I am not a patient man when I am sweating.
My jam turned out perfect, but the syrup was very thick. I think between how long it took to boil, and the pectin in the fruit, it ended up thickening up. I basically ended up with 8oz jars of blueberry syrup concentrate.
To remedy this, I made up a simple syrup of 1/2 cup water to 1/2 cup sugar, and added that to my 8oz jar of syrup for the fridge. It did not dilute the blueberry flavor at all.
Costco restaurant squeezie bottles for the win!
Just listening to the canning jars POP when they sealed was cool as hell. Every time a jar popped I ran to my wife and told her. She apparently thinks I am cute when I do this. It’s the best part of canning. It’s when you know you did it right.
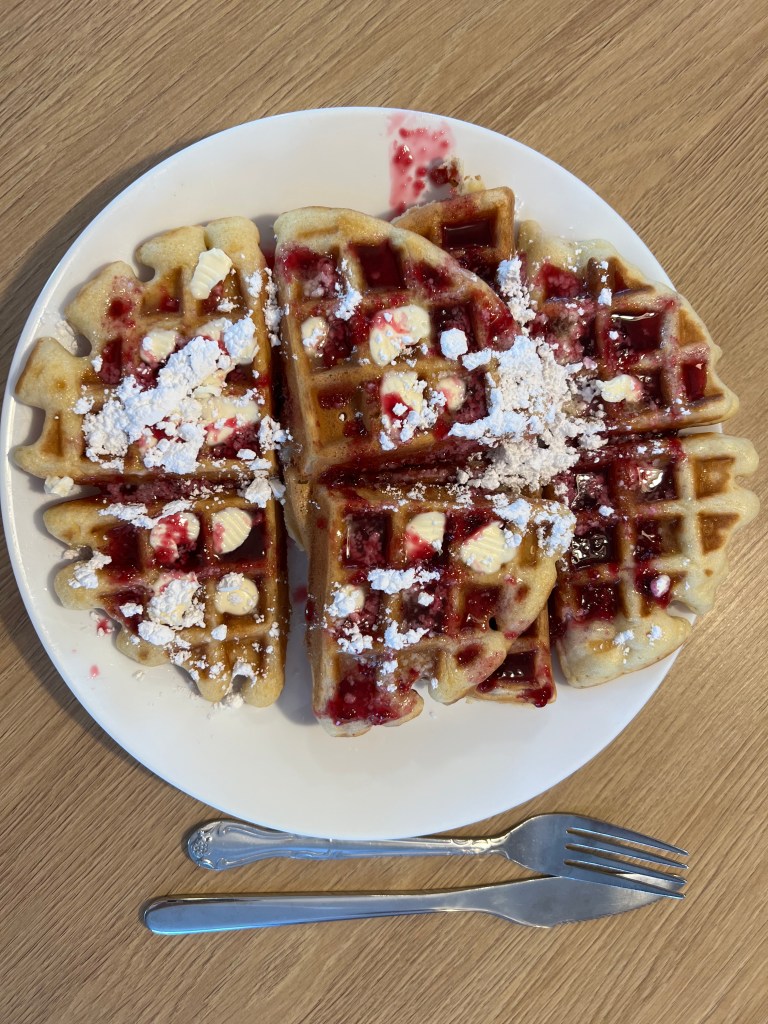
We tested the syrup out this morning when I made waffles.
WAFFLES!
These were great. Like the raspberry and strawberry jam, the flavors are through the roof. I cannot buy jam that tastes this good. You just can’t. It’s not blueberry flavoring, but real blueberries. It’s tart and sweet, and so fresh tasting.
I don’t know if I can go back to buying jam. It’s just not the same.
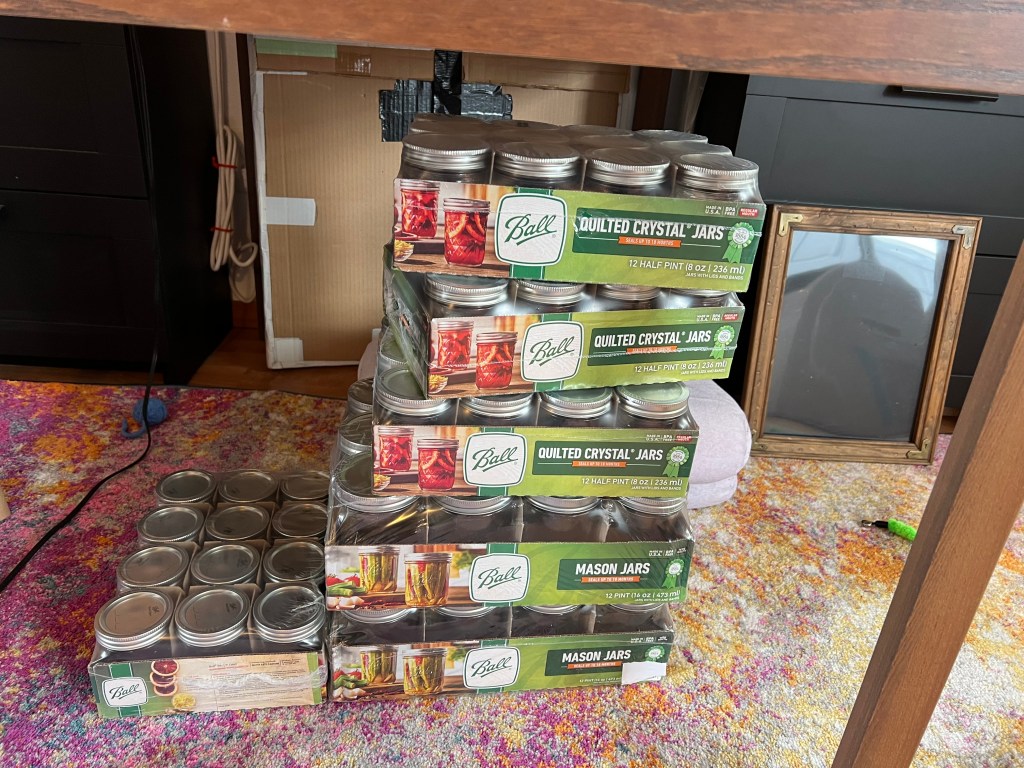
All my canning jars have arrived. I have some more 8 oz and 4 oz ones, but I have a plan for this next month that will be canning heavy.
My canning list is as follows:
Blueberry Jam
Blueberry Syrup – for pancakes!
Blackberry Jam
Raspberry Jam
Strawberry Jam
Marmalade
Pickles – from the garden.
Tomato sauce/paste/in general – from the garden. I don’t know what form this will be in, but boy howdy! will there be a lot of tomatoes this year!
The raspberry and strawberry are on the end of the jam list because I still have some from the last time.
We eat a lot of jam, though. We have it on toast, with peanut butter, and on waffles and pancakes. It’s also good with crackers on a cheese plate. Discovering home canned jam was like a doorway into accelerated jam use. From my estimate we have probably doubled how much we eat now. I’m cool with that. It’s easy and fun to make.
My plan is to maybe do some this weekend, and then try for two jams at a time until we are done with the jam and syrup list for the year.
Marmalade is new to me, so I have to figure that out. My wife loves orange marmalade. I have a recipe and will figure it out. I use pretty exclusively Ball recipes because there are some very dangerous canning directions online, and I am not really okay with sources that are not Ball or the US government preservation sites. Botulism is not the end I want, so I am going to stick to safe recipes.
I have never done pickles or tomatoes. I just have them growing in my garden, and wanted to water bath can some for the year.
That’s super ambitious, but I am into it. We will see how far I get on my plan, but I am all set up and ready to go.
We eat a lot of rice dishes and my favorite way to use up leftover cooked rice is as a breakfast porridge or congee.
Ingredients
1 TSP ginger paste from those convenient grocery store tubes, or use fresh. Whatever works for you.
1 TBSP Better Than Bouillon Chicken Flavor – Don’t use a cube of bouillon. It’s not as tasty. This stuff is a different world of flavor, and I hate brand name anything.
2 Cups cooked leftover rice. Bonus points if you made it with MSG the night before. Don’t fear the MSG.
2 Cups water, then maybe extra at the end if needed
1/4 Cup Crushed or Chopped Peanuts
1/4 Cup Low Sodium Soy Sauce – Or regular if that’s what you have.
Enough chopped green onion to top
Directions:
Add rice, water, ginger, and chicken Better than Bouillon to the sauce pot.
Bring to a low boil for somewhere around 20 minutes, or until your rice reaches a rice pudding texture. You can go longer or less, depending on your time constraints. I often do chores while it’s going and forget for a while.
If it looks too thick, add a bit of extra water, mix thoroughly, then give a minute or so to integrate.
Stir in the crushed or chopped peanuts.
Put in a soup bowl, and drizzle soy sauce on top, then add your green onions.
Notes:
I also sometimes add a fried or over easy egg, or sausage, or leftover chicken teriyaki. Basically whatever I have in the fridge at the time, or whatever I have the energy to make for it. It’s very versatile.
Garden Note:
I have these grocery store green onions I have planted in my garden when I was done with them, and I cannot emphasize enough how much better they taste planted in my garden. They have so much more flavor.
I was not holding my breath as they came from the grocery store, but apparently proper care and growing time makes them a whole different plant.
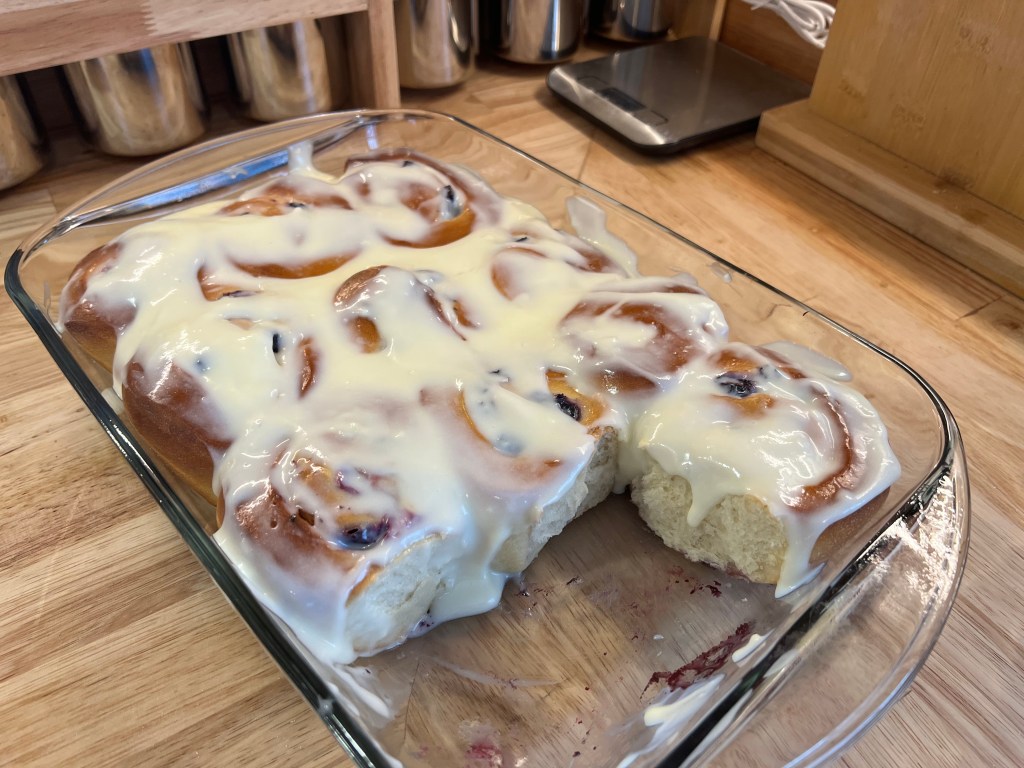
My wife got poor kid free breakfast in school, which usually consisted of cinnamon rolls. She mentioned that she loved them, so I started making them. Blueberries are also her favorite, so that’s how this was born.
The blueberry rolls are kind of like if a Danish at a coffee shop wasn’t a flat dry mess, and got its shit together to be actually tasty. Sorry not sorry. I am not a Danish fan. I basically make cinnamon rolls with a different filling.
I like to make a recipe, and then redo it, until I have it perfect. Then I write it up in my notes so I always know how to do it that way. I started making cinnamon rolls (and all sorts of other rolls) a few months back and I have been working on my recipe. This means we have been having them on the weekends more often than not.
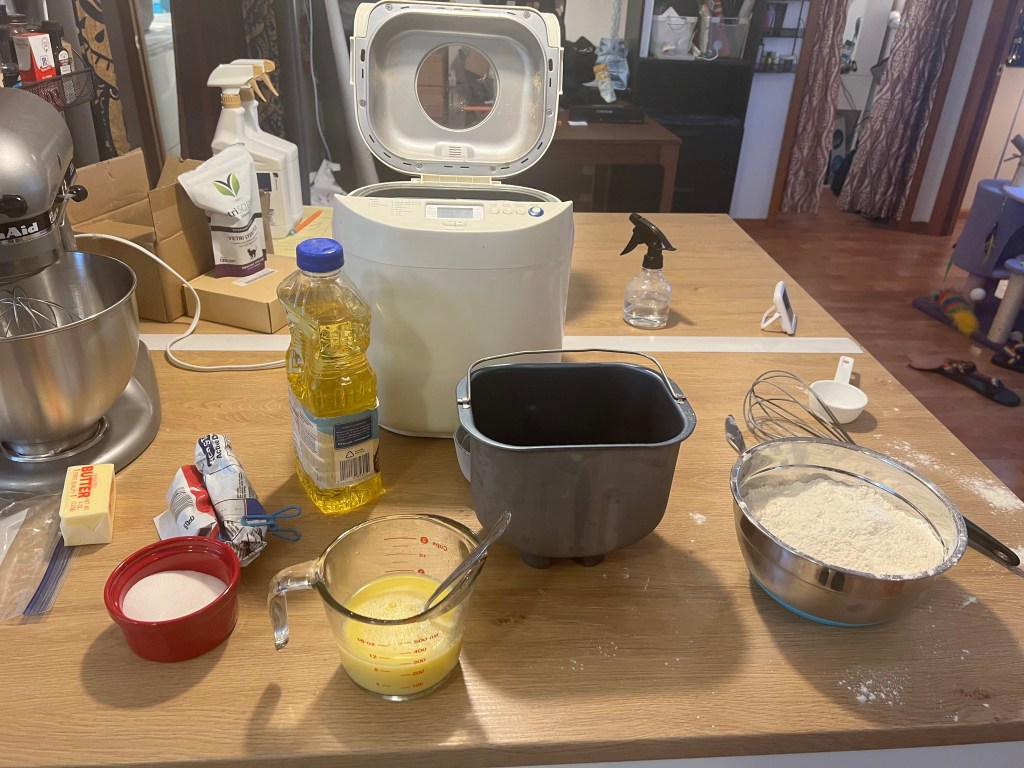
I don’t normally do anything with yeast or kneading unless it has a bread maker involved. I have a collarbone that is not fixed in place and kneading dough hurts. However, if I leave the heavy kneading of the dough to a bread maker, then I can do it.
My current recipe for cinnamon rolls came from my Breadman Ultimate Breadmaker manual, with a few adaptations. That manual actually has a lot of great recipes in it. I found it online years back, and have used it for all my subsequent bread makers.
As an aside, that Breadman Ultra machine, which was my first bread maker machine, was one I found at a St. Vincents second hand shop for $4. I had to buy a new paddle for $7 or so online, and get the manual PDF, but that was the best money I could have spent. I make pretzels, bagels, and now cinnamon rolls in additional to bread on occasion. If I didn’t do it this way, I could not knead the dough.
Ingredients – Rolls
1 large egg at room temp (Important!) plus enough warm(!) water to equal 1 cup.
3 TBSP Oil
1/3 cup sugar
1.5 TSP salt
3.5 Cups Breadflour (See AP flour to bread flour conversion below)
2 TSP Active Dry Yeast (See Yeast discussion below)
Converting All Purpose Flour into Bread Flour For every 1 cup of AP flour, remove 1.5 TSP of flour and replace with 1.5 TSP of Vital Wheat Gluten. For this recipe you will need to replace a total of 5.25 TSP of flour with Vital Wheat Gluten. I tried it without doing this, and they just didn’t have the right texture. The Vital Wheat Gluten lasts forever and makes a huge difference, so it’s worth buying a small bag to keep around.
Yeast Active dry yeast is not the same as instant yeast. If you have instant yeast, you need to use 1.25 times the amount listed. I also found this out the hard way. Now days I buy a giant Costco sized package of active dry yeast and keep most of it frozen until I need it, but sometimes we buy the wrong thing, and I had to figure out how to convert it.
Enough milk to get to a smooth consistency. Go slow. Try 1 TBSP at a time.
Directions
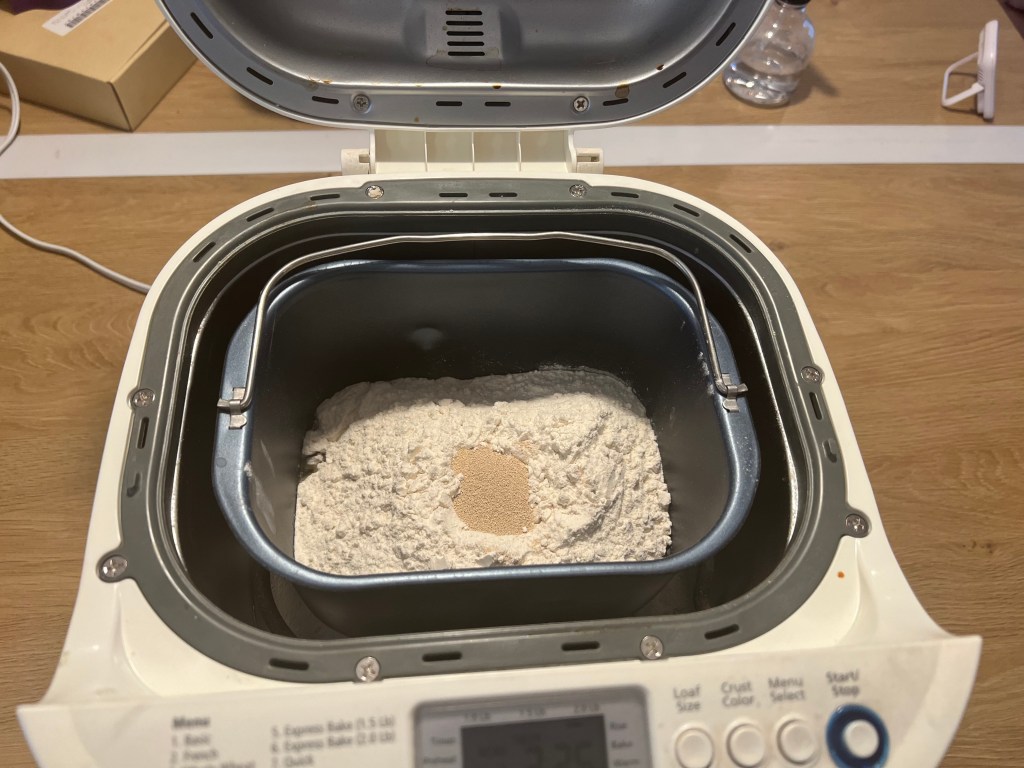
Add all the ingredients in the order listed into the bread maker, and add the yeast on the very top. You can mix the salt into the flour so it doesn’t mess with the yeast. The water egg mix needs to be room-ish temp. It can’t be ice cold. Yeast don’t like to be cold.
Put your machine on a dough cycle, and go for it. It takes about 1.5 hours in my machine.
While that is working, let the cream cheese sit out and soften until the dough is done, then right before the dough is done, mix in the sugar. You can microwave it for a few seconds if you forget. LEAVE BLUEBERRIES SEPARATE!
Once dough is done, place on lightly floured surface and roll into a 12 X 6 inch rectangle. You don’t want to make it much bigger than that, because thin dough makes kind of thin lackluster rolls.
Spread about half the cream cheese/sugar mix filling on the dough then add blueberries on top.
Roll longways into a log.
Put your roll on a cutting board, and cut into 12 1-inch slices. This is going to get messy. I use a paper towel and wipe my knife between cuts. This cream cheese filling is way messier than the cinnamon roll filling. However, it won’t matter. It all cooks up just fine, even if you make a mess of them.
Place on their sides in a buttered glass casserole dish, or whatever you have around. If you put them on a silpat on a cookie sheet they spread out, and not up. Still good, but kind of weeny in size. I like the glass casserole dish because they seem to rise really well in it.
Preheat oven to 350F.
Cover and let rise in their cooking vessel for 30 minutes until double the size. It helps if your kitchen isn’t freezing for this part because again, yeast hate cold.
Bake for 25-30 minutes.
While that is baking, mix the frosting ingredients together.
When rolls are done, let them cool for like a half hour or so, then coat them with frosting.
I bought my wife this silpat roller thing on Amazon because we have a textured IKEA countertop that is really not optimal for this kind of thing, and it works really well. Rinsing the blueberries and drying them with paper towels really kept the blueberries to themselves. You can see the non rinsed handful at the top, and the rest I rinsed and dried below. I got the cleanest dough to blueberry situation ever doing that.
These are my best rolls to date. They just feel like cinnamon rolls should. Honestly, I would make half of these because there is only two of us, but I can’t split down to less than 1 egg on a recipe, so I guess we will just have to eat them all. Oh, the tragedy!
I was just going to add the extra cream cheese as frosting, but I didn’t have enough. I was out of cream cheese for more, and too damn lazy to go out for it. My wife, who is a good baker, suggested I add powdered sugar and milk. It’s kind of a royal icing and cream cheese icing combo.
This was a happy discovery as cream cheese frosting is not my fave, and the royal icing glaze I was using was too thin. Together it’s perfect. It has body, and a bit of cream cheese tang, but it’s not overwhelming to me.
I think next time I will add some cinnamon to the filling because that works well with blueberries. I am also measuring how much flour I am using by weight so I can come up with a consistent amount by weight. Scooping flour has an annoying variability that I don’t like, and the recipe does not have a by weight option.
I have to say, again, having my own home, and not a tiny rental kitchen, really lets me make bigger things like this. It’s just so much easier when you have the room to do it. I am so grateful I get the chance to own a home and do this.
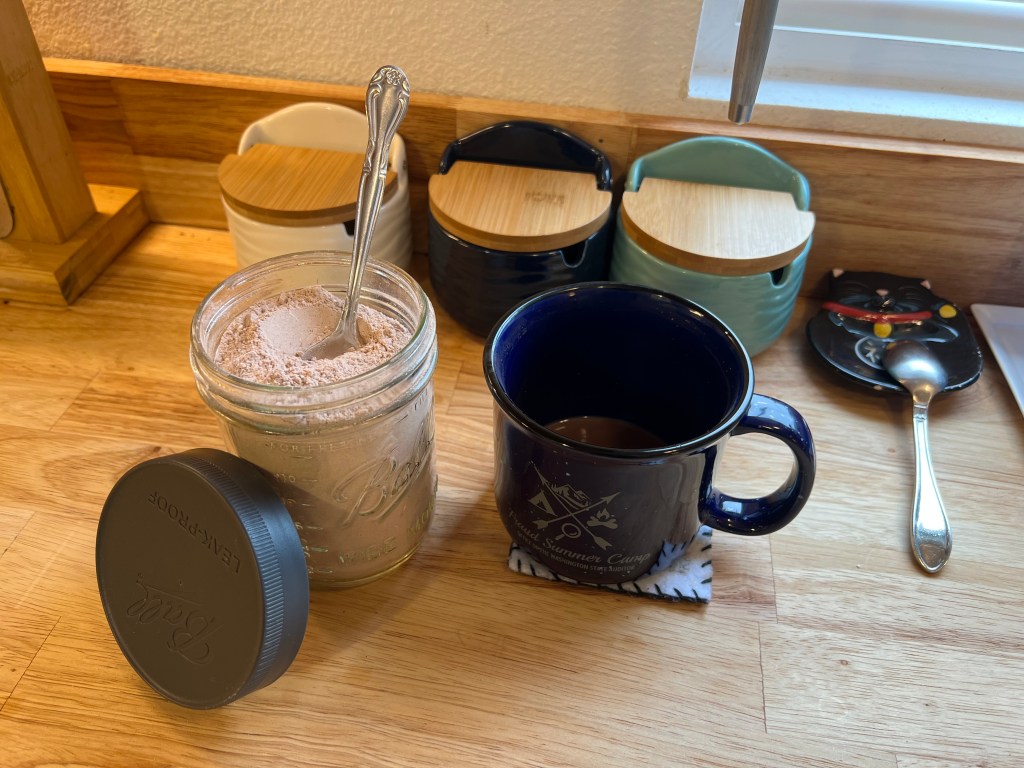
This picture is my homemade instant hot cocoa mix in front of my wife and my coffee and tea set up. The white jar is for loose sugar for my wife, the dark blue one is for instant coffee, and the teal one is for sugar cubes for me.
This is not a sponsored post. I don’t have affiliate links. This is just me, in my first home, marveling at the small upgrades I can make in order for my life to be a billion times better. I just like to document and link things.
My incinerator. Ignore the gap between the backsplash and the counter. I have to fix that. It’s relatively mild here, but is like a 1/4 inch as it creeps larger at the end of the counter. I haven’t sealed it yet because I am waiting to fix it.
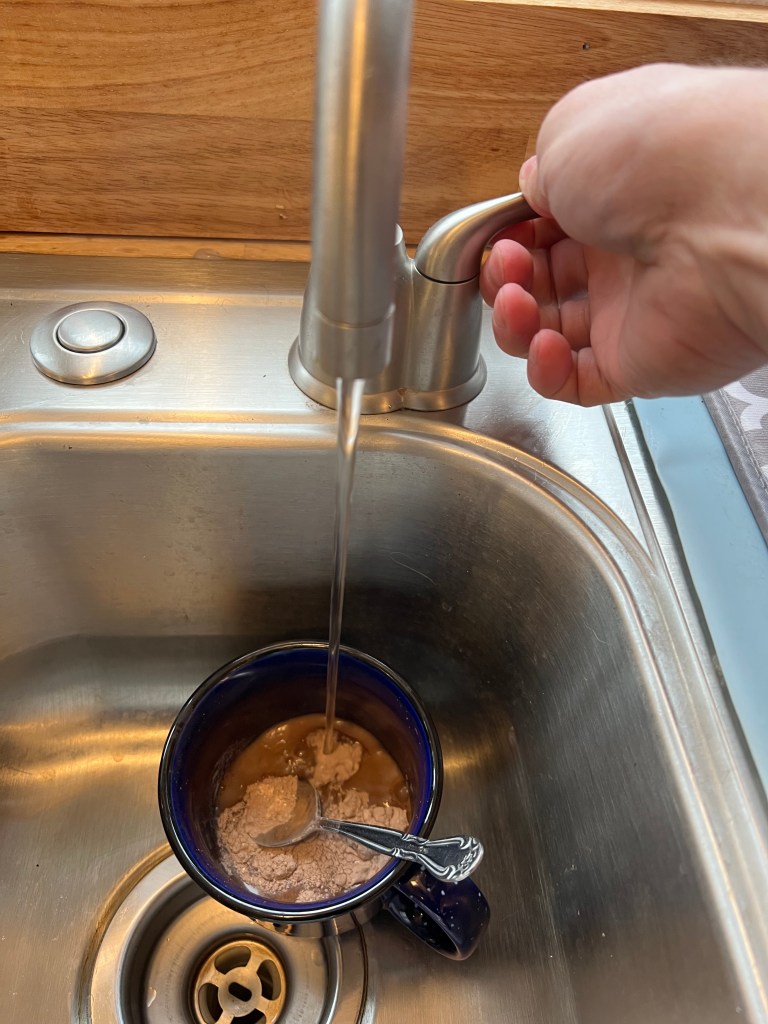
This is an Insinkerator. That’s the brand name of my infant hot water system. What it does, is deliver water hot enough to make tea out of. You can increase of lower the temperature to fit your needs.
In my home, my wife prefers instant coffee. That is probably horrifying to folks, but she grew up on it, and prefers it. Over our 30+ years of marriage we have had normal coffee makers, high end espresso machines, you name it. She always goes back to instant. This actually frees up a lot of counter space, and reduces waste from Keurig and espresso machines, presses and coffee makers.
I am a hot cocoa and tea drinker because I am a very high energy person, and caffeine takes me into the arena of damn annoying real quick, so I stick to my caffeine-free tea, and my hot cocoa. What little caffeine I get from the cocoa is about all I should ever have.
In the apartments we have been in, we were in a constant hot water kettle search. We would burn through one every year or so, because between the two of us, we would have tea, cocoa, and coffee all day long. We just killed them from over use. I was even considering one of those massive zojirushi how water dispensers.
Add to this, my wife has ADHD, and she would always come start the kettle, then leave, and an hour later come back to start the process all over. Just waiting for the water to heat was enough time in ADHD for her to end up distracted and not get her coffee. Some mornings she would realize she’d have related the task endlessly and never gotten her morning coffee.
With this in mind, one of the first items I bought for the house was a hot water on demand system. It’s like a mini on demand system that holds a gallon or so of water for your use. The Amazon listing says 3 gallons, but that’s wrong. I think it’s closer to 2/3 of a gallon.
This is like a $250 luxury. I can get my cocoa in the morning instantly. My wife no longer circles the kitchen in a remember & forget coffee dance.
I think this is the single most amazing item we have in our home. I had no idea when we put it in that it would help my wife so much. This was worth every penny. When or if it dies, I am replacing it immediately.
Being able to modify my home in such a tiny way, to help make our lives easier? I really want this for everyone. We were so lucky to get out of the rental racket, and into a home, and I just really want this for everyone.
It’s just so shocking to me that with such a relatively small purchase I can make such a huge impact on my enjoyment of my home.
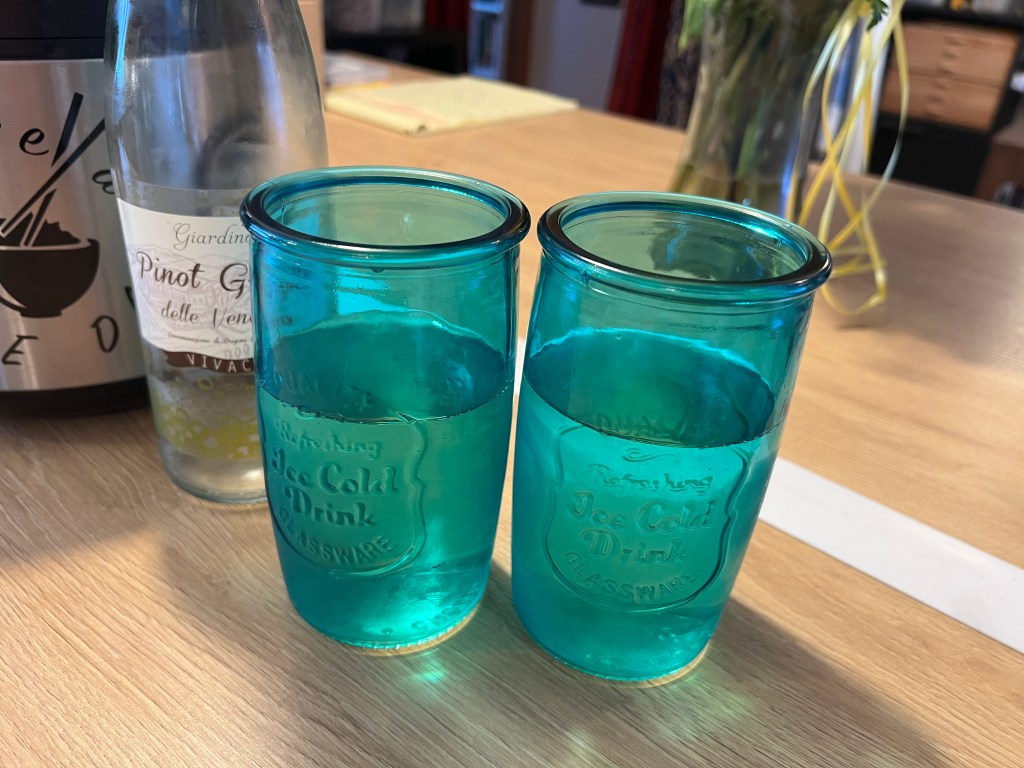
Anything is a wine glass if you try hard enough. These are 20 oz drinking glasses, presumably for water or iced tea. However, in our household they are wine glasses. We just replaced our old chipped ones with these babies.
My wife and I will split a bottle of wine about once a week, and we are lazy. Sure, I could do the wine glass thing, then refill our glasses, but let’s face it, that’s a bit disingenuous. It’s like saying, let’s have a glass of wine, maybe a half glass, knowing full well we are just going to spit the whole bottle between us, and be done with it.
Yes, there are benefits to the wine glass shape. The stem is to keep your filthy mitts off the glass so you don’t mess up the temperature. The shape is also supposed to help with flavor and aroma of the wine to give the imbiber the best flavor experience.
However, at least according to this article, wine making dates back 9000 years, and wine glasses as we know them didn’t even start appearing until the 15th century when we could make crystal glass, presumably for those that could afford them. It wasn’t until the mid twentieth century that they made it into popular usage as we know them now, and really didn’t pick up in their current form until the 1970s.
In all, the article is a good read, because it goes over the science of it all, and it turns out there isn’t a lot to back the idea of traditional wine glasses.
For me? If you love traditional wine glasses? Go for it. However, I am going to sit in my corner drinking my wine, while petting my cat, and crocheting or playing on my iPad. I could care less about the form of my glass, and I care more about having to get up and refill my glass. Plus, I doubt my palate could tell the difference anyways.