Shed Floor & Walls

Well, we are at the point where I have the floor and walls done.

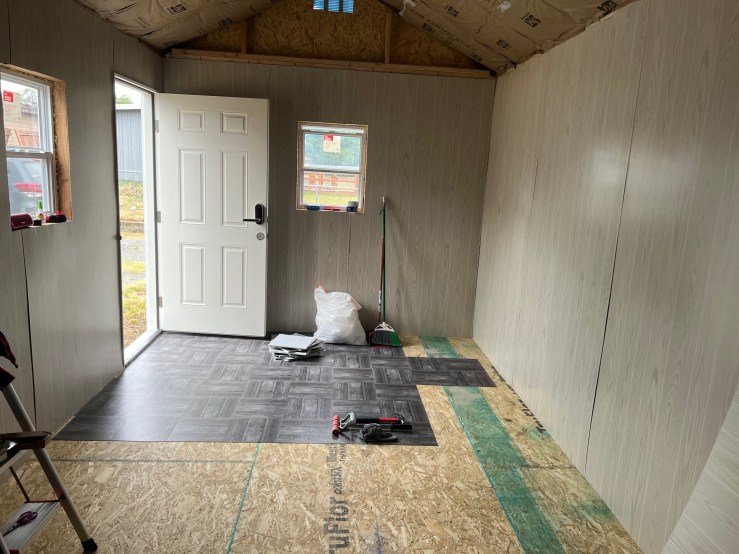
First, the floor is done, primarily. With self stick tiles there is always a chance a few of them will bow and bubble. We’ve had uncharacteristic 90F days, and it did loosen some of them. I will be using a dab of liquid nails to keep them down. That’s worked for me in the past with no issues. I lived for 7 years in a double wide trailer on a floor I put tiles like this down this way, and it looked the same when I moved out as when I put it in.

Mid flooring installation with wife.
Finished Floor.
Finished back of shed.

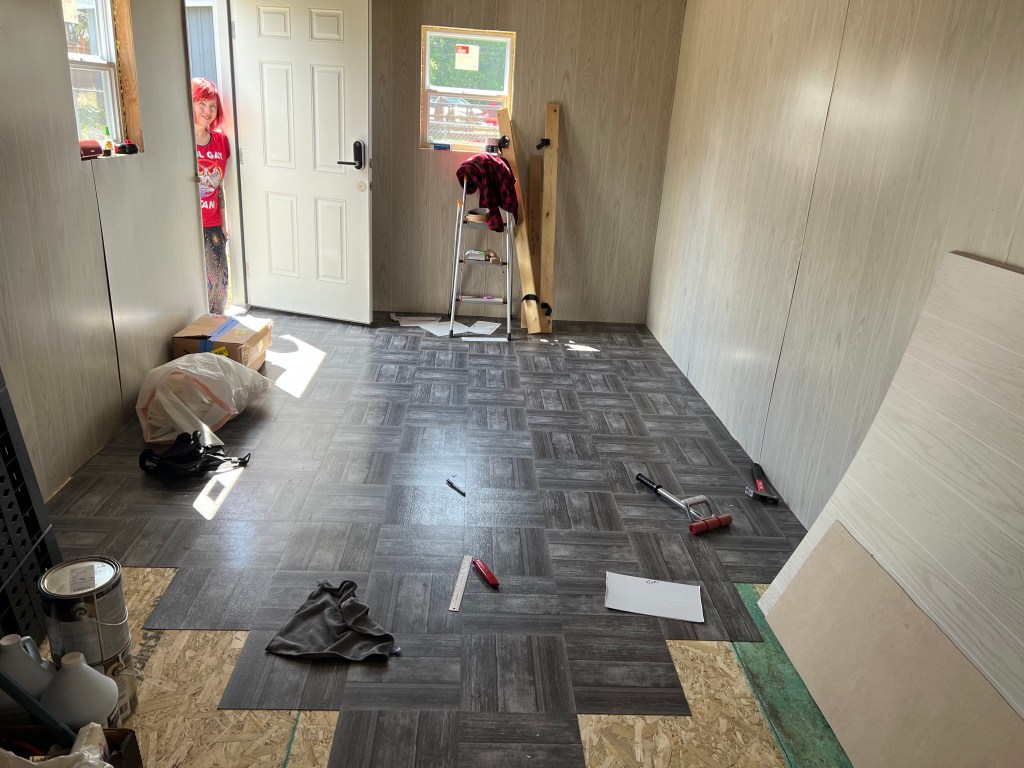
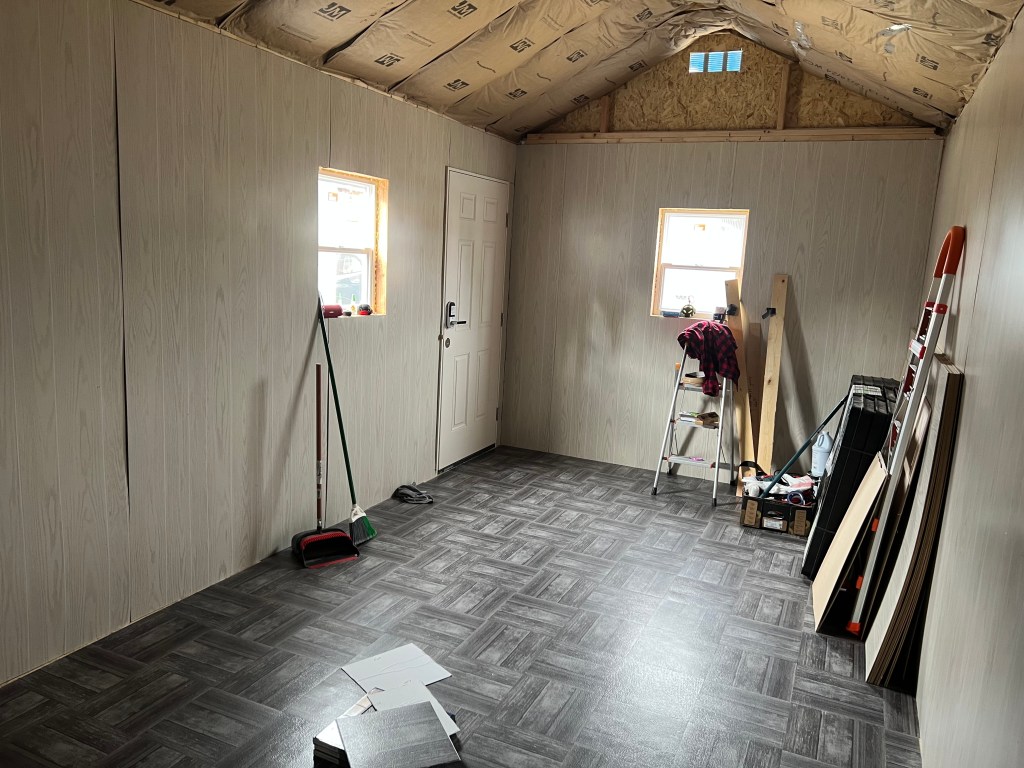
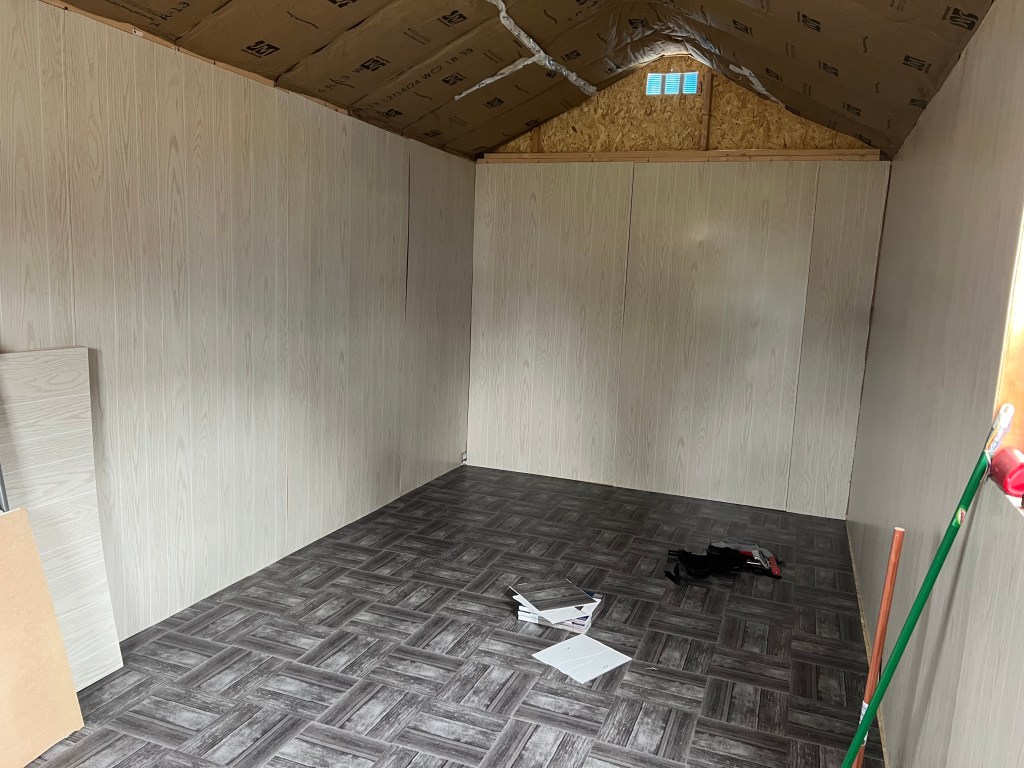
Doing a basket weave pattern with the flooring was perfect. It really hid the cheapness of the tiles. Honestly, this was an easy installation. I did have to wear knee pads as my knees can’t take floor work that easy, but I am happy with how it came out.

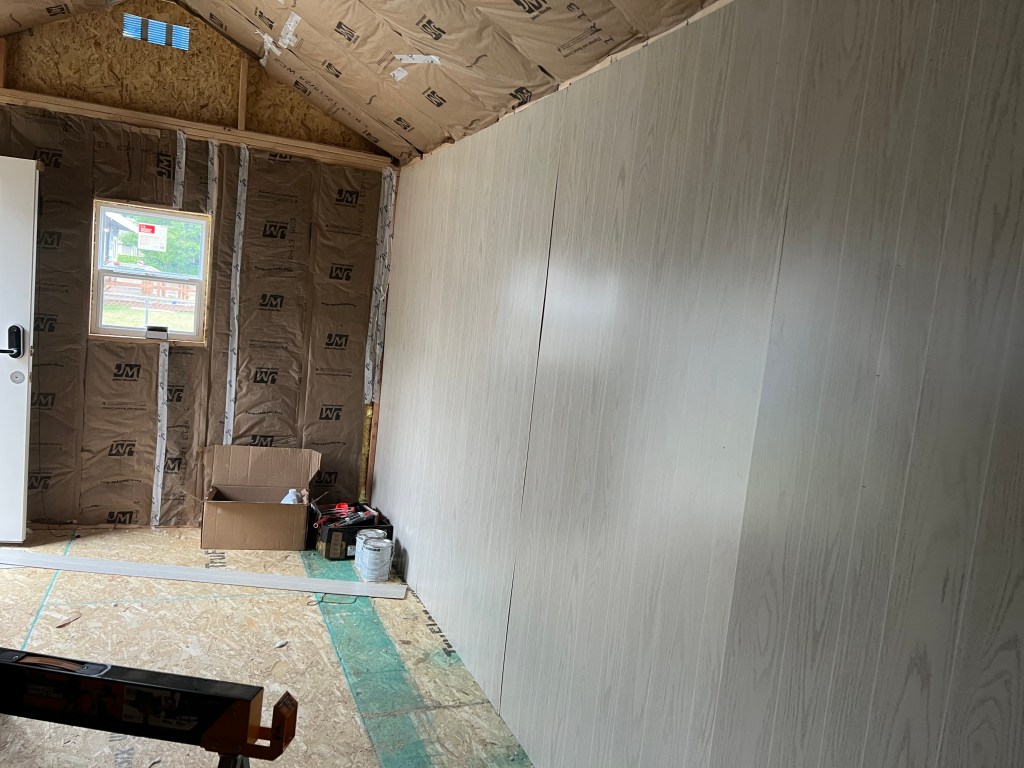
The walls? That was more frustrating. Apparently you need some H channel to put paneling up, so it slots each side of the touching panels together. The H channel available at Lowes where I bought this paneling, is not for this kind of paneling, but a slightly thinner white bathroom panel. I spent days searching every corner of the internet, and I couldn’t find it. I even tried that H channel with these paneling to see if I could retro fit it between the panels. No dice.

Instead I looked for any surface stick option. I tried stick on molding. It did not stick. I tried stick on edging for MDF shelving. It did not stick. I tried superglue to help any of these options to stick. It did not stick. I used 99% isopropyl alcohol on the seams, but even so, nothing stuck.

At this point I was sure that the surface of the cheap paneling I was using was some sort of secret non stick material that NASA should be notified of. Even epoxy did not stick to it. Literally nothing stuck on the long vertical lines where the two panels met. I tried everything.

After some hair pulling and soul searching, I reminded the inner evil voice of my father that likes to tell me I am screwing up, that this was just a fucking shed, so we were going the full cheap garbage route on this. The only way to fix this the “right” way, was to rip the paneling down, recut it to ensure the edges lined up with the 16 on center studs. However, I don’t own a table saw, and the perfect line up would be impossible and there would still be an issue, likely worse where the two edges me.

Instead, I used the only item that stuck to the paneling. White Gorilla brand duct tape. No other brand of duct tape would stick. I ran a line of duct tape down each join, imperfect as it was, and then a line of duct tape along the base for the cheap stick-it molding to adhere to.

Prepped with duct tape.

This worked. I then added the big white roll of fake molding that you usually see self-stuck in bathrooms and kitchens in cheap rentals.

With bottom trim.
With duct tape on wall seams and the bottom trim.

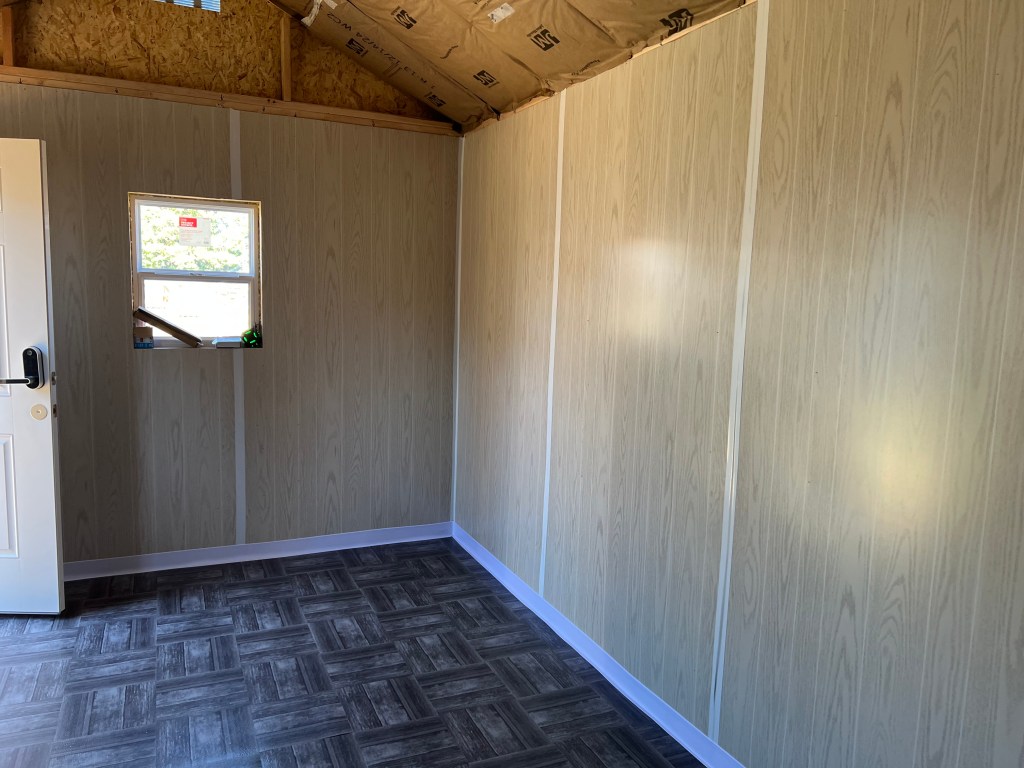
While this is certainly not the right way to do things, it is a way to do it. Once I have the shelves, the circus tent top and the artificial ivy and flowers in there, I think it won’t be as noticeable. What it does do is keep things together and that Gorilla duct tape is literally the only thing on this planet that stuck to the surface of that paneling.

In all honesty, nobody is going to see it but my wife and I, and as a place to put a workout machine, a workout bike, and some storage shelves? It’s okay. I’ll live with it.

Shed Progress

Things have been coming together the last few weeks. My wife and I have kept on moving forward with the shed progress. I wish my garden was doing as well as my shed.

Wall insulation went well.

The wall insulation took us two days. I cut all the insulation to size from the rolls, and put it in and my wife followed me with the staple gun and stapled it in. We had to do it into two days because all the bending and place for a couple of partially disabled people was like doing an endless series of burpees. However, it went in perfectly fine. The insulation is made to fit into a 16 on center bay so it’s not a hard job at all for a DIYer.

What I found shocking was just how much the sound from the freeway we live by was deadened by the insulation. Like damn. It also kept the sun from heating the shed up too much. I am sure it will be appreciated in winter.

All insulation in.

This is all of the wall insulation in. I used Tyvek tape to tape the seams that didn’t have side insulation flaps, where we cut it thin. I also used the Tyvek tape to cover any holes we accidentally punched in the vapor barrier because we are clumsy.

On to paneling.

I was really sweating the paneling stage. I had never done it before, and I am reflexively nervous about power tools no matter how often I use them.

Turns out it was pretty easy if you have two people, and one of them is over 6 foot tall. I cut the panels to size, and we positioned it in place, and my wife staple gunned the top and I did the bottom.

I had to cut a few inches off each panel because the walls are just a hair below 8 feet tall. I cut the top off one, and used the off cut as a template to cut the rest. These super thin paneling sheets could not support their own weight on the saw horses so I had to cannibalize some of my spare wood bits from the other shed to make it work.

You will notice the seams are visible. I didn’t buy any H channels for the joins, as I didn’t realize I needed them? I had never done this before. I should have, but nope. I did not. I am still working out the joins and will probably use a self sticking 7/8″ edge band if I can get it to work. I am waiting for that to come in.

One thing that really did help was a rotozip tool. I bought a Dewalt rotozip tool (No links here are affiliate links. Just what I used.) and a ten pack of paneling cutting bits. That was amazing. I was able to just put the paneling over the window, and use the rotozip to just cut around the outside. Same for the door. I just put the paneling up, and put the rotozip on the outsize molding of the door, and boom! I was able to just cut it like butter. Highly recommended if you are going to use paneling for anything. Also, get the H channel molding for between panels. Don’t be me.

Starting the floor.

Next step is the flooring. I am just using Floor Pop brand self sticking vinyl tiles. I know these are cheap, but it’s literally just a shed. I used to live in a double wide trailer and we did this across the interior because the 1960s shag carpeting was a disaster and we were poor. They actually did a great job, and held up really well. Better than my current house vinyl floor that is slowly failing, that cost the previous home owner more.

To do this right, I first rolled on a clear coat of pre installation primer adhesive. I was worried the chip board would not be a good surface to stick to. I used Henry Liquid indoor primer. I have never used that before, but you just roll it on. It is white and watery, but dries clear in a couple hours. Very recommended. It didn’t feel sticky or weird, but it kind of sealed the wood and let the vinyl tiles stick very effectively.

I also used DAP Floor patch and leveler after watching a DIY Tiff YouTube video where she uses it on her floor when she redoes it. They are the cutest tiny DIY couple ever. I love watching her progress on her house.

The green boards in the picture above had some big chunks missing from the install that would have made the thin vinyl tiles funky, so filling it worked well. It takes 6 hours to dry, so I started the rest of the flooring and that took all my working ability for the day.

To do these vinyl self stick tiles right, you have to be on top of the dust issue. I swept every few rows, and then kept a dish rag with me, and before I placed a tile, I would sweep it of any possible debris of dust with the dish rag. Then I would really wedge the edges together and kind of roll the tile into place. Then I used a floor roller to really make it adhere. The floor roller is cheap and worth your money. I also kept a hammer to pound down nails that stuck up a bit too much.

Tools and tiles.

I chose to do kind of a basket weave with these stick-it’s because if you run the tiles in the same direction, it doesn’t quite line up, and looks cheaper than if you do it as a basket weave.

I do plan to fix the tall end corner bits on the wall with the vents, but I don’t have any 2×4’s on hand. I’ll just wait on that bit until the second shed is in, and I order supplies for it, so I can pay the Lowe’s deliver fee just a single time. I have to create a 16 on center 2×4 situation up there so I can insulate that as well.

Overall, I feel like this is really starting to come together. I still need a ramp to the door, and to do the gravel around the outside as a boarder, and the panel joins and corner molding bits. However, this is coming to a close and I can see the project’s finish in sight.

Philosophically, this is a different kind of house project from what I am used to. When I was much younger, I’d have had this done in a couple of weeks. I’d have spent 12-16 hour days just plugging along, but now my body doesn’t let me.

That is kind of forcing me to accept my limitations. Like yesterday I started the flooring, and I didn’t feel like I did much, but boy howdy did I feel being on the floor that long. I’ll just keep plugging along and eventually it will be done.

Ceiling Insulation

My first impression of insulating a ceiling is that the damn insulation is so expensive! The R13, 23 inch wide insulation was $126.50 for 11 bats. I had to buy two. That was the most expensive item on my interior list of supplies. By comparison the 15 inch insulation that is 32 feet per roll was only $31.87 per roll. The funniest part was when I was trying to find a source for this, every post I found was of some other person complaining about the price. I guess I am in good company.

The good thing is I only used half the second package so I only have to buy one more for the back yard workshop shed we are planning for last summer.

My second impression is this is more of a two person job. While it likely could be done solo, it’s really hard to get the bat of insulation above you, stuffed between the joists, hope it stays, then try to staple it. That’s a lot.

My wife and I worked together. She is taller and it was easier for her too stand on a step ladder and get it started and feed it to me on my scaffolding. I waffled on buying the scaffolding but for $99 it was worth it. It will come in handy when I fix the house ceilings where the previous owner didn’t use drywall tape and the joins are all cracking.

First bats in.

We were careful not to impeded the soffit vents, or the ridge vent at the top, but just kept it secured to the outside of the joists. We discovered the 8′ bats of insulation got us over the ridge vent area, and down the other side. I have seen YouTube videos of people doing it every which way, so I didn’t think it would be a big deal to just do it the way we did, then patch in a short bit on the other side.

Since we had such issues with the hammer tacker and our weeny arm strength last time, we used an electric staple/nail gun. I got it on sale for half price, and it was the hero tool of the day. (None of these are affiliate links. I just liked the products.)

I thought it would be annoying dealing with a cord, but it was so much faster. My only gripe is it didn’t hold enough staples at one time. I also had to use an electric one as I am not set up for pneumatic tools.

Within two hours we had all the insulation in.

Insulation installed.

That afternoon we noticed immediately that the shed did not heat up as hot from the sun hitting the roof. That’s impressive. Insulation is so worth it.

I did come back and use some tyvek tape to tape the seems on the joined bits of insulation. We overlapped a tiny bit, and I tucked the white fiberglass in, and taped the brown paper to keep our paper barrier intact. I also taped the holes in the paper from delivery. This worked well as I could feel a small breeze in the join, and that killed that problem.

Taped the joins in the bats.

Overall, the ceiling insulation was the hardest bit for us to complete. That is likely due to our own physical limitations. It’s slow going as we can’t do much at a time, but we are getting there.

Next will bet the walls. I don’t know how much we can do in a day, but it will certainly be easier because we don’t have to reach over our heads.

Insulation Baffles

My wife and I started insulating the ceiling of the shed. This was the hardest so far physically for both of us. I am not sure I could have completed it easily if she wasn’t 6’2″ tall with “monkey arms.”

I can only do a few hours of work each week. I mean, if my body was fine, I would do more, but neither my wife or I am in good enough shape that we can do much more. I miss being in my 30s and being able to do a full 8 hours of physical work without being in pain for the next day, and being in bed for the next two.

The first order of business was the ceiling baffles. We got the shed option with a ridge vent. There was a bit of a mix up on the types of venting we needed, so we had a ridge vent and a gable vent. I did not realize the gable vent was on the sides of the shed. I will actually close that in because it’s not needed. Instead I used a 2″ hole cutter on my drill and went around and drilled out 2 holes in each bay of the soffit.

Holes in the soffit that I cut for venting.

This was harder on my shoulder and collar bone than I would like. It’s at an angle and I no longer have the physical strength to really power through. It only took me a half hour, but it was physically a lot for me.

I don’t have pictures but I didn’t have any drop in vents for it, but I did have some left over replacement window screen, so I cut that and used some liquid nails to glue them in place. Very cheap, effective, and nobody is gonna see anyways. I will have to touch up the paint around the holes though as I had drill drift on some of them.

We opted for 2×6″ joists to fit the baffles and the insulation. My wife actually had to do the majority of the baffle work because again, I am short and it was just easier for her.

Wife working on the baffles.

While she did that, I glued the screens in place, added puffy foam around the windows and doors, and generally did everything but put the baffles in. I did not have a handle on the expansion of the insulation “doors and windows” puffy foam, and made a mess. I will have to cut that down later.

Puff foam overextending and making a mess!

As a side note we used a hammer tacker for this. It was the only device I had with staples short enough not to punch through the roof sheathing. It worked all right, but 1) it took a hot minute for me to figure out how to load it, and 2) asking two unfit people to use this device was hilariously hard. It was really hard at an angle, above our heads, to swing with enough force to make it work. I followed my wife with a hammer when needed to sink the stables.

Hammer tacker.

In all, we got it in, and feel really good about it. We were careful to not put the baffles down too low, so that would flow from the soffit vents up along the roof to the sheathing.

Finished baffles!

I think, for two half broken Middle Ages people, we did a pretty good job. I am super proud of my wife, as she doesn’t normally do house fix it stuff, but she did a great job at getting it all in.

New Shed Projects

I have two problems. My home is only 899 square feet and my wife and I want to work out at home, instead of a gym because my wife is visibly transgender and in the current political climate that is not great. Even if the bluest of blue areas, we run into people that have taken this new political attack on trans folks as open season, carte blanche, to just be the shittiest humans ever. I also hate going to the gym, as it’s a lot of hassle, even thought I am read as cisgender as a man.

Those two issues combined mean we decided to have a large, 10′ x 20′ shed in our front yard, with a second identical one replacing the back yard shed so it can be a workroom and have more storage as well.

We looked up local codes, and since we are in an unincorporated area, the county codes say we can have any freestanding shed up to 200 square feet. We got an email back after pestering them confirming this. My biggest fear was doing all this and having to have it ripped down. However, it looks like as long as we have a 3′ setback, we are good. We went with 4′ so we can do a gravel “moat” around the shed, eating up more grass I don’t want to mow.

We decided to have a local place, South Sound Structures, do the work. We got quotes from several people, but honestly this place was in the ballpark and had far more options, including a normal house front door we could put an electronic pin lock on.

All said and done, the shed was $7,944.67. This included the house grade door, two windows, under floor insulation, 2×6″ rafters, and ridge vents. It also includes a 5 year warranty as long as it’s painted within 60 days. That’s not terrible, really, considering I am old and broken and that level or work would take a year of “healthy” days for me. That also includes a $300 off for something or other, but I think they do that on all their invoices.

On 4/21/25, Matias and friend showed up, and damn if they didn’t have that shed done in record time. They didn’t take all day to do it. They come with everything pre-cut, and just assemble it. I was watching on and off all day from inside, and they did everything 110% right. I saw no shortcuts, or half assed work at all. I was relieved as the last contractor situation we had did not go great.

I know the pictures are behind glass, but I didn’t want to make the workers uncomfortable by always running out there to take pictures.

Starting the job!

I was honestly impressed that with only two people they got it done so fast.

Shed in progress!
Like it only took a few hours and they got it up!
Almost done!
Pretty much done.
Finished!

I am seriously gobsmacked by how fast and efficient they were. Plus, 10′ x 20′ is a huge amount of space, and enough for something like a Bowflex, a bike, and some free weights, plus some seating and shelves for kitchen overflow storage.

One of the things I did not expect to like was that it completely obscures the view of the constant traffic in and out of the house across the street. Sometimes folks that live there would just like stand in the doorway and watch into our windows and it made us so uncomfortable I put in privacy film in all my windows.

Now it’s like my front porch feels like a safe little oasis. We can sit on it, and enjoy it, and not feel like folks are constantly staring at us. The shed is taller than a fence, so it’s great. When we eventually get the 6′ fence put in, we will have a lot of privacy then. I prefer we are safe in our own little world where folks don’t stare at us and judge my wife for being visibly trans.

So far, it feels so worth the money. Painting is next, then insulation, and paneling and flooring. Finally my gravel moat, and a small entrance ramp. Then I can move in exercise equipment and whatnot.

Bathroom Drywall

Well, with my wife’s cancer health scare behind us, and my health being more reasonable these days, I am starting to work in things again.

I managed to drywall the hole in my bathroom wall from the HVAC install months and months ago. I was pretty intimidated by the idea of drywall work, but I watched a few YouTube videos, and got the strapping in and the drywall up.

Drywall hung and first bit of joint compound added. I used a brown construction paper to shield the other side.

It was actually easier than expected. What really helped is I own a multitool and was able to cut the old drywall back to where it made sense and could allow me to drill the new stuff into the studs. I made sure to use the natural clean edges of the drywall to where they hit the opening. I used 150 grit sandpaper between to just knock things flat. I am inexperienced so it was easier to build it up and then sand it down. The 150 grit made it quick work, and I was ready in minutes. Clean up was a bit messy, but fine.

I also used Fibafuze instead of paper tape. It’s a fiberglass tape. It was so easy to work with, but I recommend gloves because of the glass bits in the fiberglass. I used duct tape to get all the splinters out of my fingers after. I just stuck the tape to my skin where I felt it, and eventually it lifted them out. Despite that oversight, I would use fibafuze again. It make really easy smooth joints.

Finished joints in the drywall with an orange peel texture over it. There really isn’t any lines between the new and old, but the camera seems to think there is.

I used the same orange peel texture that is over every wall in the house, and it disguises my imperfections. It’s all done, and ready for paint.

I thought I had a bit of leftover paint from the previous owner, but it was a solid puck of acrylic when I opened it. Apparently 2.5 years have gone by since we bought the place, and time does that.

I probably won’t paint until we get the mirror area fixed above the sink. This place was built for a very short elderly lady, so the vanity mirror is very low. I am 5’6″ tall and I am at the very top of the mirror. My 6’2″ wife has to stoop to see herself.

What’s stopping me is the lighting is also right on top the vanity mirror. I need to get an electrician to move the light upwards towards the ceiling because I just don’t fuck with electrical. I have a quote for $454 to move it up where it should go by the ceiling. I’ll pay it just to not fuck with electrical.

Then I will have to rebuild the vanity, and I can install a sink cabinet that isn’t so low my wife has to bend over.

That’s a long way to say I’m not painting and finishing the wall right now.

All in all, though, I feel like I conquered drywall. Am I an expert? No. Can I do it well enough to be happy about it? Absolutely! Even better, I have enough leftovers I can patch anything that comes up now and not have to worry about it. Having the tools on hand really makes a difference.

Non-Update Update

Well, not much is getting done. I might miss this season for gardening. After surgery I had a lot of recovery time, then I had to work on getting my garden cage squirrel-proofed, and that is a lot to do.

I haven’t even tried to plant without these protections in place because the squirrels are literally digging up my beds constantly. It’s never ending.

My garden plan is to finish the hoop house, and see if I can put some late crops in. Then slowly turn to my other beds. I have a new strawberry bed I need to cage up, as well as a sunflower, flower bed and herb beds that needs caged.

I have about 3/4 of my hoop house covered but it’s slow going. I just take a long time to heal, and my recovery from general anesthetic along with my work obligations have been a lot.

I am wrapping 1/2″ hardware cloth over the entire thing. I am using bricks to weigh down the ends of it, so squirrels can’t get in. You can literally see the squirrel holes in this picture.

My wife has been helping me because her 6’2″ height and long arms are very helpful compared to my 5’6″ stature. I am hoping this weekend to get more done. I am out of bricks so maybe I will pick some up on Wednesday afternoon.

I do like that in the picture you can see all the clover coming in. I’ve had a lot of it grow in from last year. I’ve been mowing it just like grass. I love it. I am going to seed the bald spots again and see if that helps. Clover is so nice! I don’t know why folks do grass yards.

We also had our HVAC system changed out a few months back to a heat pump. This is the single best adult purchase in my entire life. Our house is from 1935 and has thin exterior walls, so being able to control the heat and cold in the house to be comfy is a god send.

We spent $26,000 to do have the work done, and some of it was electrical to prep for this. We will see about getting some of that back at tax time, but honestly? I’d rather pay the small low interest home loan we got for it, and be comfortable.

It’s been a few months and we’ve had a few hot days, and it’s amazing. This, combined with the roof vents, and crawl space insulation means that no matter what, our home is the perfect temperature. This is the first time in a year and a half that it’s not over hot or over cold.

I decided I didn’t want to mow around the heat pump unit, so I dug up the grass around it, and laid down landscaping cloth, and put some gravel over that.

This is so tiny, but literally took me two hours, and I was physically wrecked for days!

I wanted to make sure the mowers or weed eaters didn’t come in contact with the important bits below:

Ignore the landscaping cloth peeking through, I am getting another bag of gravel this weekend to cover it.

Now we don’t have to worry about accidentally breaking anything. Honestly, I’d do the whole side of the house that way, because I hate grass lawns.

The other project I have been doing, a window or two at the time, is reflective UV film. I have been putting it on all the windows. it’s just like a giant vinyl sticker you install on the inside of your windows, that keeps out the heat, and is reflective enough you can’t see in.

You can hardly see in at all, and it sure does keep the heat of the sun out.

We have some very busy neighbors and my wife and I didn’t want to have folks being able to see us in our home. We found a product on Amazon, and used the silver version. No affiliate link, this is just what I used.

I was just impressed with how much heat this window film keeps out. It is also damn near impossible to see. In the picture above you can kind of see the back window, but that’s at 2 feet from the window. On the street, you see literally nothing. It’s 10/10 on blocking heat, and 10/10 on blocking folks from seeing in.

I am just trying to get all this infrastructure projects done. I don’t feel it’s the fun projects, but the basic ones to make everything livable. I am more into the decorating and planting, not the insulating and making the house livable.

I think next spring I will have all the garden beds protected with cages. I will have all the big livable projects done, and can start planting and maybe doing cool artsy decorating projects. I look forward to that.

Mostly, I am trying to give myself the grace that I would extend to anyone else. I am partially disabled. I can’t lift, or move the way healthy young folks can, so I am doing a lot. It’s just on my terms. I like to remind myself of that when I feel I am missing my own self imposed deadlines.

It is amazing though, that I have a house, and I can work on projects at my own pace because I will live here next year, and next year and so on. I sometimes forget I get to live here forever because I am so used to renting.

Door Adornment

While I did the wooden butcher block backsplashes, I wanted to extend the backsplash upwards a bit. I cook a lot, and it includes things like canning jam, and frying up things. My kitchen runs hot and heavy, and I would just like to be able to wipe down the walls behind my counters easier. From experience, it’s nicer to have an easy to clean surface.

My first attempt was to buy some self sticking backsplash tiles off amazon. (Not an affiliate link, I don’t have affiliate links.) They said stickers, and I guess they really were, because I would not use them for a backsplash. They also weren’t sticky enough that I trusted them to stay up. Surprisingly some of them came with a pinkish background, so not the colors I was going for.

However, I got to thinking about them, and decided to adorn my very white front and back doors with them. I figured it might look nice to have them in the panels of the doors.

I tested one to see if they would stick and work out.

First I measured every panel I wanted to do, in order to make sure every panel’s measurement was what I expected it to be. I like to be thorough on measuring because sometimes things are made off by manufacturers.

Notice my really cool NicPro Carpenter pencil! OMG, I can’t break the lead on this thing. Sooooo recommended. My hands shake and I always break pencil lead, so that is a cool pencil.

The tiles were supposed to be 6′ square, but they aren’t. They were 5 and 15/16ths. That’s just enough to be annoying.

I then used piece of paper with the size of the sticker tile, and then split how much I needed to take off into 2, and marked each side, so I could take an even amount off of each sticker tile.

I used this for every tile I had, so I could get them all at 5 1/2 inches wide without having to measure each one. Safer that way!

I then used a normal Fiskar paper cuter to cut the tiles.

I’ve had this old paper cuter forever, and it works great.

To do the length down in the center panels, it was a little trickier. The center panels were 22″ down, but 4 tiles was 1.5″ longer than that. I divided it by 4 using a fraction calculator online, then divided that by 2, and made another little paper template so I could make marks and cut all four of the tiles, making sure to take the same amount off the top and bottom.

The bottom panel was the opposite problem. It was only 1/4″ longer than the length of 3 tiles, and I did not want to cut down 4 tiles that much. Instead, I just applied those bottom panel tiles 1/8″ lower than the true top, and you couldn’t even tell.

Applying the tiles is similar to applying a Cricut vinyl project. I used a scraper to smooth out the bubbles. The sticker tiles were not especially sticky, and if I had an issue with a bubble they were easy to peal off and do again.

One thing I think was important for me, was to accept that was it was impossible to make it perfect. The tiles slid, and cut funky, and applying them was a little odd from the normal vinyl I was used to. However, with the white door background, you could not tell unless you got nose to door with where there were imperfections.

I think sometimes it’s easy, especially for me, to just give up if I can’t make things mathematically perfect. However the tiles themselves did not have a perfect printing run with some uncentered tiles, so I just went with it, and I am glad I did.

Finished front door.
Finished back door with Tally, who “helped” the entire time for certain definitions of “helping”.

I’m pretty glad I did this. I like it. My home is not a show home, or a “normal” home, but it is my home. I don’t ever plan to leave it, and I want to live in a place that feels good for me. I don’t want plane white doors.

I did have enough extra I added some to my super cheap white IKEA desk, too.

This cheap IKEA desk was what I got when we moved in. Most of our furniture was super cheap as the house cost was a lot! Personalizing it is a good step until I need to replace it for a longer lasting desk.

This was a last minute project because I had these stickers and I didn’t want to return them. I am glad I did it. It took me an hour or so, and nothing is better than a project with instant gratification.

Shelves

I have been down for the count a bit this last month. I have to go have a surgery, which I did not want to have. It’s not like I am going to die, but it will greatly improve my life. It gets in the way of my projects, and my life in general, but what are you going to do?

I did manage to get myself together enough to get some shelves installed. In our spare bedroom we have a wardrobe/walk in closet area for my wife, with her makeup desk and its large lighted mirror. I get the small closet for my hanging clothing, and a small table for my sewing machine. It’s also where the home wifi, router, and modem come into the house. It’s all utilitarian, and as such we needed more shelves.

I had two sections of shelves to put up, the first being a wifi and router shelf above my wife’s makeup table.

I will move the mirror and the jewelry hanger, slightly, and put up the shelves.

I used my stud finder to find the studs, and actually drilled an extra screw hole in the brackets. They are technically supposed to go into a closet made system, but will hold to the wall studs just fine for what we are doing.

The studs aren’t always where I expected them to be in this ancient little house so a stud finder is invaluable.

I prefer these double hook hanger style shelf brackets. I have the single ones pictured below in the bathroom and they are not that secure. Sure they won’t fall off the wall, but the shelves wiggle to much. I will replace them with the double style versions once above when I get around to it because life’s too short to be irritated by wiggly shelves. Plus, the double style brackets have holes to screw the shelves to the brackets so you never have to worry about accidentally knocking them down.

Sure the brackets are long, but we might want that later. The mirror isn’t up yet because I am waiting on more command strip picture hangers to put it back.

The router and wifi will fit up there, and it’s tall enough my wife can’t bonk her head. Few people are taller than her, so I think it will work.

Part of the reason for it’s placement here is to get it away from the electrical panel so there’s less interference, put it closer to the center of the house, for better wifi coverage, and to place it on the other side of the wall from my wife’s desk so she can hard wife into it for YouTube uploads. Her desk is actually set into a closet, and her computer equipment is on the top shelf, so I will be putting a hole through it so we can run cords through for her to hard wire to it.

The second set is above my wife’s dresser. I wanted to center them over the printer, but the studs were not where you’d expect, and it was just more secure to do it this way. I will have to forever live with it not being centered. It won’t bother my wife, but I will probably rework this problem in my head for as long as this is set up this way. Maybe by next year when we repaint, I will think of something.

You can see the issue with why we need somewhere to put the papers.

My wife makes these great 5 x 7 laminated card stock game cards for her tabletop games. She creates them for missions, characters, NPCs, items, and locations. They are amazing and look like professionally made game pieces. We bought an Epson liquid toner printer for it, which as a great bargain as we’ve done hundreds of prints on the original cartridges. This means she needs space to put her supplies.

Once again, this was as easy as using a stud finder to find the wonky stud placement. Interior walls in the little blue house are sometimes not there? Like you’d expect them to be 18 on center, but they skimped. This means, sometimes there are no studs at all in places you’d expect them. Old houses are weird. The external walls are fine, but just the interior ones are like this.

It took me very little time to get the shelves up and secured.

Shelves for my wife.

This would probably not be optimal if it was for me, because I am 5’6″. However at my wife’s 6’2″ she can reach the top shelf without a ladder.

I am sure she will organize these when she gets to it. We are thinking baskets or bins, as that works with her ADHD, and my need for organization both.

I can’t tell you how grateful I am to have a home because I can do this. If we find we don’t like it? I’ll just rip it out, patch it and do something else. Just having that freedom is astounding. I wish everyone could have a home they could do that with.

The funniest part of this entire process is now my shelves are level and straight to a degree the rest of the house isn’t. The little blue house isn’t terrible, but it’s old, and not as level as you’d hope.

Unicorn Spit & Rough Wood Projects

There is this gel stain finish called Unicorn Spit. (This is not a paid for spot, because nobody would ever pay me!) Its claim to fame is it’s near universal in what it covers, and it’s very vibrant. It comes in a rainbow of colors. If you want the official user’s handbook on their website, you will have to pay $27 for it. I’m not really up to paying someone $27 for how to use their product so I read the directions, and watched some clearly promotional YouTube videos.

I had two projects I was working on. One is a large wall mounted spice rack for my approximately 10 billion spices, and the other is a basic box for a coffee table made out of plywood.

After I finished making and sanding my projects, I used an old chip brush to paint on the Unicorn Spit. If you use it straight it doesn’t cover raw wood very well, and takes a lot of stain. However, I found using a spray bottle filled with water really worked well. I would dab a bit on the wood, spray spray spray, then brush it back and forth. It covered shockingly well. I was very impressed with that.

I did several coats, and put my brush in a ziplock bag and froze it between coats so I didn’t have to wash it out. The brush thaws right out, and it’s like you never stopped, when you have to take a break. This works with latex house paint as well, incidentally.

They actually recommend to dilute it and seems like you can dilute it with a lot of options per their directions. I wanted a super deep color so I went with my spray bottle technique and it worked out well.

There were spots that I had a hard time getting, but I just kept touching it up until I was satisfied. I used a rag to rub it around for maximum coverage after I did the first coat.

Yes I do use my can goods to prop up my projects when I paint them.

When it dries, it dries to a chalky texture. The website had some options for finishes, and I was going to use a wax sealant initially. I just wasn’t sure it would cut it. Just touching the wood would give me a light blue dusting on my skin, so I needed something more than that. I decided to use Minwax clear poly on it, and put on three coats, with light sanding between it.

You have to be careful if you use poly to seal, I did my second coat too soon, and smudged off the blue in some areas of my 1 x 4 spice rack. I fixed it by mixing some acrylic blue paint with some triple thick varnish and you can’t even tell. So nothing to worry about too much.

Here is the finished coffee table top. It’s hard to get a photo of the color. In this photo it looks like washed out patches, but in real life, it’s really stunning and nice. It’s like a sea of blue variegations.

This is all I wanted in a coffee table. It holds my crochet bag so the cat can’t get to my yarn, and my pot box, and soon to be home for my Arizer. No longer living in an apartment means I don’t have to hide everything in a closet anymore, so I wanted my coffee table to have space for it all.

I looked at all sorts of options for a coffee table, but I just didn’t like any. It had to be a bit tall because my couch was tall, so I just made a simple plywood box. The ones online seemed overpriced, and cheaply made, and weren’t the right height. Plus, I like to keep my feet on it, and eat off of it so it had to survive me.

For the spices, I have tried numerous organizational processes in the new house. The problem is, I have a lot of spices, and I make my own blends. I can’t digest garlic, it seems, so I do all my own blends for my most used items. Add to that, I cook a lot of different styles, so I need spices for Indian food, Chinese food, Japanese food, Italian food, you name it. My wife also bakes, so we need that too. What we have on hand is usually indicative of what we’ve been cooking in the last 6-9 months or so.

Even better, we can see them all. My wife has ADHD and if it’s out of site, it doesn’t exist. To a certain extent, having them all crammed back in a tiny cupboard meant I was over buying as well.

I will probably use the Unicorn Spit again. I have bedroom night stands I am making out of plywood, so I will probably use the same blue Unicorn Spit process for them.

While I sanded the coffee table, the plywood was still too rough. I think if I do it again, I am going to really sand the crap out of it. The spice rack was sanded 1 x 4’s and it was so glossy smooth and the color came out so great.

I am still learning to work with wood, so while this is a really rough beginners project, I am still super happy with it.